Happy Thanksgiving! I hope your day is filled with yummy things, people you love, and lots and lots of gratitude. Today will be tough for us, as it's the first holiday for our family without my brother-in-law. But it will also be good to get that first holiday without him behind us. And on this day of gratitude, I am so thankful that he was part of our lives, even if it wasn't for as long as we would have liked. I will miss his smirking grin and dry humor at dinner today, though.
I thought that this card was quite appropriate today, as this card embodies Thanksgiving (at least to me!) Before running the background of the card through my Big Shot with the Woodgrain embossing folder, I randomly stamped with the splatter stamp in the Gorgeous Grunge set. I used Baked Brown Sugar ink on BBS card stock. Next, I used the faux suede technique on the strips of Cajun Craze and Crushed Curry.
For the "thanks" in the center, I used the rock & roll technique with Crushed Curry, Cajun Craze, and Cherry Cobbler ink. Beginning with the Curry, ink the entire stamp. (But don't stamp on the paper yet!) Next, roll the edges of the stamp in Cajun, making sure to pick up enough ink to go beyond the very edge of the stamp. I will sometimes flip the stamp and put the ink to the stamp, rather than stamp to ink. Finally, roll the edges in Cherry Cobbler. Breathe on the stamp to moisten the ink, and stamp. Cut out using Apothecary Accents Framelits, snipping off the right hand side with paper snips.
I topped the whole thing off by dyeing piece of Cotton Ribbon to match the Baked Brown Sugar card stock. I simply filled an empty spritzer with rubbing alcohol, then added a few drops of ink refill. I spritzed the ribbon until it was the desired shade. I prefer this method, as it's not quite as messy as using an ink pad to dye ribbon.
Supplies
Stamps: Seasonally Scattered, Gorgeous Grunge
Ink: Baked Brown Sugar, Crushed Curry, Cajun Craze, Cherry Cobbler
Paper: Baked Brown Sugar, Crushed Curry, Cajun Craze, Very Vanilla card stock
Accessories: Big Shot, Apothecary Accents Framelits, Woodgrain Embossing Folder, Linen Thread, Cotton Ribbon, Paper Snips, Sponge
Showing posts with label Gorgeous Grunge. Show all posts
Thursday, November 27, 2014
Wednesday, July 2, 2014
Work of Art Shadow Box Card
But the good news is that I do have a card to show you today! This is one we made at stamp club a few weeks ago, and while it looks complicated, it's not. I love the ease of shadow box cards, and the wow factor that they give. If you'd like directions on how to make a shadow box card, click here.
This card uses the new set Work of Art. I LOVE this set. It's mostly comprised of brushstroke images, which are great for backgrounds. For this card, I paired it with Gorgeous Grunge, and it's a match made in stamping heaven. They are perfect together. I topped the whole thing off with a couple of buttons I made from the Simply Pressed Clay and Molds. If you haven't tried out clay yet, you really should. It's so versatile and inexpensive...totally worth your money!
Supplies
Stamps: Work of Art, Gorgeous Grunge
Ink: Coastal Cabana, Bermuda Bay, Island Indigo
Paper: Bermuda Bay and Whisper White
Accessories: Big Shot, Ovals Collection Framelits, Simply Pressed Clay and Molds, Island Indigo Baker's Twine
Monday, April 28, 2014
So Sorry Circle Flip Card
I wasn't going to show this card for a while, but since it's loaded with retiring products, I thought that sooner was better than later! Unfortunately, Summer Starfruit card stock is no longer available. Trust me, I'm as sad about that as you are! I may try to post this same card in different colors later this week. Other retiring items include the So Sorry stamp set and the ribbon.
Tips & Tricks
- Did you know you can make a really cool linen look with the Gorgeous Grunge stamp set? How great is that? I love that set, for so many reasons, and now I have one more! Just randomly stamp in two directions until you're satisfied with the look. I used Summer Starfruit ink and card stock for a tone on tone look, and it's just perfect.
- Someone recently asked me how I know when to punch first and when to stamp first. A lot of it is just kind of learned behavior that comes with lots of practice. But a good rule of thumb is that if something needs to be centered, stamp then punch. So in the case of the circle in the middle, I stamped the "So Sorry" then punched, and then stamped the flowers. I could have stamped those before punching, but doing it after allowed me to better see the placement of the image, and I was much happier with it that way.
Supplies
Stamps: So Sorry, Just Believe (retired), Gorgeous Grunge
Ink: Summer Starfruit, Smokey Slate, Night of Navy
Paper: Summer Starfruit and Very Vanilla card stock, Comfort Cafe Designer Series Paper (retired)
Accessories: Big Shot, Circle Card Thinlits, 2 1/2" Circle Punch, Midnight Muse Stitched Satin Ribbon
Friday, April 18, 2014
Simple Shadow Box Card
This simple shadow box card is for one of my daughter's good friends. We just found out that she has to have surgery, so I wanted to have a special card to give to her to let her know we're thinking of her and praying for her. Thankfully it's a relatively minor issue, but she's going to have a rough few days as she recovers. What better color combination for a little girl than pink and purple? I love how Wisteria Wonder and Strawberry Slush look together!
I've made shadow box cards before, and even won an award for one (although technically these are called diorama cards). But those were a bit more complicated to make. This one is SO simple. It really only took me a few minutes to make this!
Tips & Tricks
Stamps: Just Believe, Gorgeous Grunge, Teeny Tiny Wishes
Ink: Wisteria Wonder, Strawberry Slush, and Wild Wasabi, Glimmer Ink refill
Paper: Wisteria Wonder and Naturals White card stock
Accessories: Big Shot, Deco Labels Framelits*, Strawberry Slush Stretch Ruffle Ribbon, Dazzling Details, Bitty Banners Framelits, Linen Thread, Button, Spritzer bottle
*The RETIRED PRODUCTS LIST comes out on Monday. Be sure to check back here for links to the list. I have no inside knowledge, but I highly suspect that the Deco Labels Framelits will be on that list. Due to the fact that Karen Burniston has not renewed her contract with the makers of our Framelits and other Sizzix products, I'm guessing that everything with her name next to it in the catalog will also be retiring.
If you want to be sure to get the items from your wish list that appear on the retiring list, go here to place an online order. If you use hostess code 9WKB7ZYE, you'll receive a gift from me. :)
I've made shadow box cards before, and even won an award for one (although technically these are called diorama cards). But those were a bit more complicated to make. This one is SO simple. It really only took me a few minutes to make this!
Tips & Tricks
- Just cut two pieces (one for the front, one for the back) of card stock 4 1/4" x 5 1/2" and score at the 1/2", 1", 4 1/2", and 5" marks.
- After you've scored, cut out some type of hole in the center of your front piece. I used the Deco Labels Framelits* here.
- Stamp the background. I also spritzed some sparkles using the Glimmer Ink Refill and some rubbing alcohol in a spritzer bottle. If you plan on stamping or embossing the front, go ahead and do that now.
- Once everything is stamped and embellished, adhere to two pieces together along the sides using Sticky Strip.
Stamps: Just Believe, Gorgeous Grunge, Teeny Tiny Wishes
Ink: Wisteria Wonder, Strawberry Slush, and Wild Wasabi, Glimmer Ink refill
Paper: Wisteria Wonder and Naturals White card stock
Accessories: Big Shot, Deco Labels Framelits*, Strawberry Slush Stretch Ruffle Ribbon, Dazzling Details, Bitty Banners Framelits, Linen Thread, Button, Spritzer bottle
*The RETIRED PRODUCTS LIST comes out on Monday. Be sure to check back here for links to the list. I have no inside knowledge, but I highly suspect that the Deco Labels Framelits will be on that list. Due to the fact that Karen Burniston has not renewed her contract with the makers of our Framelits and other Sizzix products, I'm guessing that everything with her name next to it in the catalog will also be retiring.
If you want to be sure to get the items from your wish list that appear on the retiring list, go here to place an online order. If you use hostess code 9WKB7ZYE, you'll receive a gift from me. :)
Friday, April 4, 2014
Simple Washi Tape Card
This is just a simple card I whipped up in a few minutes. It's one I'll be making with about 20 tween girls later today, so I needed something simple and easy, but also on that's fun to make. I think they'll love the splatters and the washi tape. At least I hope so!
Supplies
Stamps: Thoughts & Prayers, Gorgeous Grunge
Ink: Daffodil Delight and Melon Mambo
Paper: Naturals White and Island Indigo card stock
Accessories: Large Oval Punch, Scallop Oval Punch, Gingham Garden Designer Washi Tape
Supplies
Stamps: Thoughts & Prayers, Gorgeous Grunge
Ink: Daffodil Delight and Melon Mambo
Paper: Naturals White and Island Indigo card stock
Accessories: Large Oval Punch, Scallop Oval Punch, Gingham Garden Designer Washi Tape
Friday, March 21, 2014
Retro Fresh Angled Tag Topper Punch Card
I have another busy card filled with arrows today. I think I've decided that I like this one from a couple of weeks ago after all, so why not try another take on the arrows?
This card uses paper from the Retro Fresh Designer Series Paper, and I just love the color combination. As time goes by, I am loving Coastal Cabana more and more, especially when it's paired with Tangerine Tango.
Tips & Tricks
Stamps: Just Sayin', Gorgeous Grunge
Ink: Coastal Cabana
Paper: Retro Fresh DSP, Soft Suede, Tangerine Tango, and Very Vanilla card stock
Accessories: Big Shot, Word Bubbles Framelits, Label Card Thinlits, Arrows Embossing Folder, Angled Tag Topper Punch, Very Vanilla 1/8" Taffeta Ribbon
This card uses paper from the Retro Fresh Designer Series Paper, and I just love the color combination. As time goes by, I am loving Coastal Cabana more and more, especially when it's paired with Tangerine Tango.
Tips & Tricks
- I wanted to add some arrows to the card to go along with the arrows on the paper. The Label Card Thinlits set has two different arrows in it. Actually, the Circle Card Thinlits set also has an arrow, so if you have either set, you can cut out some arrows!
- See that little strip of Coastal Cabana in the middle? By cutting your card stock 4" x 1/2", it will fit perfectly into one of the lines of arrows in the Arrows Embossing Folder. It adds just a little bit of subtle texture that this card needed.
Stamps: Just Sayin', Gorgeous Grunge
Ink: Coastal Cabana
Paper: Retro Fresh DSP, Soft Suede, Tangerine Tango, and Very Vanilla card stock
Accessories: Big Shot, Word Bubbles Framelits, Label Card Thinlits, Arrows Embossing Folder, Angled Tag Topper Punch, Very Vanilla 1/8" Taffeta Ribbon
Wednesday, March 12, 2014
Stampin' Up! Designer Washi Tape Card
If you visit my blog regularly, it's probably obvious that I love Stampin' Up!'s Designer Washi Tape. I first bought it on a whim, and wasn't really sure what to do with it. But I've fallen in love with how easy it is to use, and how quickly I can pull together a card when I'm in a hurry.
Tips & Tricks
Stamps: Gorgeous Grunge, Yippee-Skippee
Ink: Crumb Cake ink pad, Old Olive, Tangerine Tango, and Daffodil Delight Stampin' Write markers
Paper: Naturals White and Daffodil Delight card stock
Accessories: Angled Tag Topper Punch, Daffodil Delight Seam Binding Ribbon, Sweet Sorbet Accessories Pack, Season of Style Designer Washi Tape, Gingham Garden Designer Washi Tape, and Retro Fresh Designer Washi Tape
Tips & Tricks
- The cork flowers in the Sale-a-Bration Sweet Sorbet Accessories Pack are a fun new element. They are self-adhesive, which makes them even better! Since two of mine are hanging off the edge of the tag, some of the sticky back was still exposed. I covered up those sections with scrap card stock and trimmed around the edge. This way nothing will get stuck to the sticky backs.
- I'm sure there are several ways to go about matting the tags made with the new Tag Topper Punches, but I just trim my card stock to be a bit smaller on the sides, punch it, and then just trim the top with my trimmer and angled sides with my paper snips. The angled sides are small enough that it's not difficult to just eyeball it.
Stamps: Gorgeous Grunge, Yippee-Skippee
Ink: Crumb Cake ink pad, Old Olive, Tangerine Tango, and Daffodil Delight Stampin' Write markers
Paper: Naturals White and Daffodil Delight card stock
Accessories: Angled Tag Topper Punch, Daffodil Delight Seam Binding Ribbon, Sweet Sorbet Accessories Pack, Season of Style Designer Washi Tape, Gingham Garden Designer Washi Tape, and Retro Fresh Designer Washi Tape
Wednesday, March 5, 2014
Stampin' Up! Angled Tag Topper Punch
I'm not quite sure where to start with this card, because I'm not quite sure what it is. There is a LOT going on here. It's one of those cards that never started as a plan in my head (most do), and I just kind of sat down and started using some new things. All that to say, the jury's still out on this one...I'm just not sure what I think. But I do love the colors!
Tips & Tricks
- If you're stumped for a good color combination, start with an element that picks the colors for you, such as the Retro Fresh Washi Tape I used here (Designer Series Paper will also do the trick!) I only had to look to the tape to know that I needed to pull out Soft Suede, Very Vanilla, So Saffron, Tangerine Tango and Coastal Cabana. (When I say Coastal Cabana, I start singing "Copacabana" in my head. Does this happen to anyone else? No? OK, what can I say? I grew up listening to Barry Manilow, and I'll admit, I still like him. Although I do prefer the younger, less plastic version of him.)
- The Angled Tag Topper Punch...you just need this. That is my tip. :) No, really...this looks like it wraps around the Very Vanilla card stock, but I really just punched two tags. So easy!
Supplies
Stamps: Yippee-Skippee, Gorgeous Grunge, Map it Out
Ink: Coastal Cabana, Soft Suede, and Tangerine Tango
Paper: Very Vanilla, So Saffron, Coastal Cabana, Soft Suede, and Tangerine Tango
Accessories: Big Shot, Word Bubbles Framelits, Label Card Thinlits, Angled Tag Topper Punch, Linen Thread, Retro Fresh Designer Washi Tape
And you really need to listen to this (but really just the first 3 1/2 minutes). You'll thank me every time you pull out Coastal Cabana. :)
Now I can't stop...here's a bonus, my favorite. :)
Monday, February 10, 2014
Just Sayin'
I've waited a long time to order from the Occasions Catalog, and the Just Sayin'/Word Bubbles Framelits bundle was the first thing on my list. So I think it's funny that the first card I made only used the words from one stamp, and didn't use the Framelits at all! Don't worry, I'll be playing with those a lot more this week and will have plenty of cards to show in the next couple of weeks!
I decided to play with the current Fab Friday color challenge this week. I wasn't in love with the color combination at first, but I figured it was a great way to stretch and try something new. I'm so glad I did, because I really like these colors together! In fact, check back on Wednesday for another card using these same colors! I might be sort of addicted to this combination.
Tips & Tricks
Stamps: Just Sayin', Oh Hello, Gorgeous Grunge, Banner Blast
Ink: Real Red and Coastal Cabana
Paper: Crumb Cake, Real Red, Coastal Cabana, and Whisper White card stock
Accessories: Big Shot, Hearts Collection Framelits, Chevron Embossing Folder, Small Heart Punch, Whisper White Baker's Twine
I decided to play with the current Fab Friday color challenge this week. I wasn't in love with the color combination at first, but I figured it was a great way to stretch and try something new. I'm so glad I did, because I really like these colors together! In fact, check back on Wednesday for another card using these same colors! I might be sort of addicted to this combination.
Tips & Tricks
- You might notice that I didn't use a single heart/Valentine stamp on this card. That's because I don't have any current ones, and my old retired ones just weren't singing out to me. That's when my Hearts Collection Framelits and Small Heart Punch come in handy! I used three different stamps, then just punched or cut out the heart shapes. It's a great way to add texture to cards. The dots, chevron, and splatter prints all came from different stamp sets, but are really fun together. And none of them were heart shaped stamps.
- Use a marker and color right on your stamps to either get a multi-colored image or just select a part of an image (like I did here.) I didn't want the word bubble around the words this time, so I just used my Real Red marker to color the words and stamp on my card.
Stamps: Just Sayin', Oh Hello, Gorgeous Grunge, Banner Blast
Ink: Real Red and Coastal Cabana
Paper: Crumb Cake, Real Red, Coastal Cabana, and Whisper White card stock
Accessories: Big Shot, Hearts Collection Framelits, Chevron Embossing Folder, Small Heart Punch, Whisper White Baker's Twine
Saturday, January 18, 2014
Gorgeous Grunge Valentine
As I mentioned before, I've been having fun making Valentine cards, and this one is definitely my kids' favorite. I think it might be mine, too.
Tips & Tricks
- I love this layout, as it's so versatile. If it looks familiar, it's probably because you've seen it before here. Two very different cards, using the same layout (and even some of the same elements, like washi tape!) Don't be afraid to CASE your own cards!
- Vellum can be tricky, because it's transparent. That means that your adhesive is going to show through. I've found that just a dot of the Tombo Multipurpose Glue, or even a glue dot are the best adhesives to use. I used the glue on the lower vellum heart here, and it's barely visible. For the higher heart, I just tucked it behind another heart, which is where I hid my adhesive.
Supplies
Stamps: Gorgeous Grunge, Tiny Tags (retired)
Ink: Raspberry Ripple, Blushing Bride
Paper: Raspberry Ripple, Pink Pirouette, and Naturals White card stock, Vellum
Accessories: Big Shot, Fashionable Hearts Embosslits, Bitty Banners Framelits, Gingham Garden Designer Washi Tape, Linen Thread
Monday, December 30, 2013
Gorgeous Grunge Washi Tape Birthday Card
I made this card as a birthday card, but it kind of makes me think of New Year's Eve with the "confetti" background and the party hat. Although there are never celebrations of that level at my house on New Year's Eve. We have a long-standing tradition (this will be 19 years!) of getting together with college friends and just hanging out together. I'm usually fighting sleep from about 10:00 on and have all I can do to stay awake to watch the ball drop. I'm pretty pathetic.
Tips & Tricks
Supplies
Stamps: Gorgeous Grunge, Pennant Parade, Itty Bitty Banners
Ink: Melon Mambo and Daffodil Delight
Paper: Island Indigo, Whisper White, and Melon Mambo card stock
Accessories: Big Shot, Bitty Banners Framelits, Pennant Builder Punch, Scallop Circle Punch, Gingham Garden Designer Washi Tape, Island Indigo Baker's Twine, Paper Piercing Tool and Mat
So how about you? What New Year's Eve traditions do you have? Do you prefer big parties, or mellow get-togethers?
Tips & Tricks
- Washi Tape is an easy way to add a fun element to a card. Simply tear off a piece and stick it to your card front. I let it run off one edge here, and just folded it around to the back. You could always trim the excess, but in my opinion, that's just an extra step that's not necessary.
- Since there are some see-through parts on the designs of the Gingham Garden Designer Washi Tape, I suggest adhering the tape, masking it off, and then stamping. Otherwise, you'll see your background through the tape. I've use lighter colors here, so that step wouldn't be necessary, however, darker colors would really show through the tape.
Supplies
Stamps: Gorgeous Grunge, Pennant Parade, Itty Bitty Banners
Ink: Melon Mambo and Daffodil Delight
Paper: Island Indigo, Whisper White, and Melon Mambo card stock
Accessories: Big Shot, Bitty Banners Framelits, Pennant Builder Punch, Scallop Circle Punch, Gingham Garden Designer Washi Tape, Island Indigo Baker's Twine, Paper Piercing Tool and Mat
So how about you? What New Year's Eve traditions do you have? Do you prefer big parties, or mellow get-togethers?
Wednesday, October 30, 2013
Peekaboo Frames Window Card {Tutorial}
This is the other card we made a club this month. It's an interactive card that uses the Peekaboo Frames Die. Below is the card once the tab is pulled. Fun, isn't it?
I'm going to attempt a photo tutorial, and I'll admit right off the bat that it leaves much to be desired. But you'll show me some grace, right, and just be happy for my attempt? Thanks! OK, ready? Here goes...The first thing you'll want to do is cut a standard card size in Pear Pizzazz and score it. Cut a piece of Gingham Garden Designer Series Paper (DSP) to 4" x 5-1/4" and adhere it to your card. You'll notice that I made three different variations of this card with different papers in this pack.
Yes, I took a picture of DSP on card stock, but don't have one for the next step. Because no one knows how to adhere DSP to card stock. Really, I don't think any of you are really that dense. Next up, you'll want to cut out a piece of card stock using your Big Shot and the Peekaboo Frames Die. Use the shape that looks like a big Curly Label Punch. It's in the corner of the die.
After cutting, you'll need to score. Get out your handy dandy Simply Scored Scoring Tool and line it up as shown below. You'll want to score at 3/4" and 1-5/8".
Use your bone folder to fold on the two score lines you just created, as well as the original line made by the die itself. Set that aside for a few minutes.
Take a piece of Daffodil Delight card stock, cut to 3-3/4" x 1-3/4" and insert one end into the Decorative Label punch as shown below. This allows you to cut one end, leaving the length of the strip intact.
After punching the end of your pull tab, stamp an arrow on the punched end. I used one of the tiny arrows from the Designer Typeset Photopolymer Stamp Set. I love how the stamp shows the color ink that you use. Yes, I get excited about the little things.
Here's how it looks once it's been stamped. This will indicate to the recipient that they should pull on the tab...you know, so they aren't completely confused about what they are supposed to do with your card.
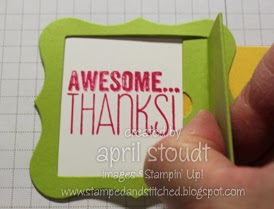
OK, it's important to pay attention to this step. Cut a piece of Whisper White card stock 2-3/8" x 2-1/4" and stamp your sentiment slightly to the left. Do not do this:
It should look like this...see how it's not centered, but slightly to the left?
And now it's time to start putting the whole thing together. Place a piece of sticky strip on the front of the Daffodil Delight strip. Be sure it's on the same side as the arrow, but at the other end. Attach this to the back of the Pear Pizzazz piece. It will adhere to the part with the little notch in it. I've shown it here from the back and again how it looks from the front. Don't worry that the Daffodil Delight is showing through...we'll take care of that later.
Now that you have that done, it's time to attach your sentiment. The best adhesive for this step is Glue Dots. Feel free to use whatever adhesive you like, but don't say I didn't warn you. Put a glue dot right at the point of each corner, on the back of the Pear Pizzazz piece, as shown here:
Try to get the glue dots as close to the inside opening as possible, but don't stress about it. These dots will be used to attach the window to the Whisper White piece that's stamped with the sentiment. You have a little bit of play, so make adjustments if you accidentally stamped crooked.
I find that it works best to pinch the window open while doing this...it makes centering the sentiment a bit easier. Be sure not to get any adhesive between the Daffodil Delight card stock and the Pear Pizzazz card stock.
Go ahead and adhere this to the front of the card. Keep your adhesive to the Pear Pizzazz and Whisper White. Again, don't get any adhesive on the Daffodil Delight or the pull tab won't work.
Are you hanging in there? The hard part is behind you and it's easy peasy from here on out. You'll need a piece of Whisper White cut to 1-1/2" x 1-3/4" and a piece of Daffodil Delight cut to 2-3/8" x 2-1/4". Stamp one of the splotches from Gorgeous Grunge in Daffodil Delight on the Whisper White card stock, then adhere that to the Daffodil Delight card stock.
To adhere this piece to the window, put adhesive only on the panel shown below. If you put it on the entire thing, the window won't open and then you'll have to start all over. You don't want that.
Next up is a step that I neglected to photograph. Cut a teeny piece of Whisper White to 5/16" x 2" then cover it with a piece of Gingham Garden Designer Washi Tape. I used the floral, but any of them would look great. Put some adhesive on the smallest part of the window (the part with the notch.)
Place your Washi Tape covered card stock on that section. It should cover the notch and go right up against the Daffodil Delight piece. Once done, embellish with an Island Indigo butterfly cut out with the Beautiful Wings Embosslit and the Big Shot. Use a Stampin' Dimensional so it pops.
One more thing...if you'd like to add a little something to the inside of your card, stamp it with the Gingham wheel. Since you're just going the width of a card, you can ink it up with an ink pad instead of a cartridge. Just be sure to do your stamping on some grid paper, and not on the Simply Scored Tool, as it looks like I'm doing here. :)
And that's it...you're done! I'd love to see your samples...be sure to add a link in the comments if you make one! Or, email a picture of it and I'll feature it here!
Supplies
Stamps: Gorgeous Grunge, Designer Typeset Photopolymer Set, and Gingham Wheel
Ink: Pear Pizzazz, Melon Mambo, and Daffodil Delight Classic Ink
Paper: Pear Pizzazz, Daffodil Delight, Island Indigo, and Whisper White card stock, Gingham Garden Designer Series Paper
Accessories: Big Shot, Beautiful Wings Embosslit, Peekaboo Frames Die, Gingham Garden Designer Washi Tape, Clear Block A, Decorative Label Punch
Monday, October 28, 2013
Easy Washi Tape Card
I'm finally getting around to posting the cards we made a club...over a week ago! This month I featured the Gingham Garden suite of products, and this card showcases the Designer Washi Tape wonderfully! I saw this card by Mindy Backes and knew it would be the perfect card for club. Our other card was a bit more involved, so I wanted to be sure this one was quick and easy. And it is! With Stampin' Up!'s variety of Designer Washi Tape, it could be replicated for all kind of occasions. In fact, I'm pretty sure I'm going to make a Christmas variation of this card.
Tips & Tricks
Stamps: Yippee-Skippee and Gorgeous Grunge
Ink: Daffodil Delight and Melon Mambo Classic Ink
Paper: Melon Mambo, Island Indigo, and Whisper White card stock
Accessories: Daffodil Delight Seam Binding Ribbon, Gingham Garden Designer Washi Tape, Decorative Label Punch, Extra Large Oval Punch, Paper Snips
Tips & Tricks
- Stamp before adhering the Washi Tape. It's just easier that way. :)
- Washi Tape is great, because if it's not lined up right where you want it, just peel it off and try again.
- After punching our your card stock with the Decorative Label punch, you may want to snip off the points at the top and bottom. They just kind of look weird sticking out from behind the oval. You can leave the ones on the ends...those look fine!
Stamps: Yippee-Skippee and Gorgeous Grunge
Ink: Daffodil Delight and Melon Mambo Classic Ink
Paper: Melon Mambo, Island Indigo, and Whisper White card stock
Accessories: Daffodil Delight Seam Binding Ribbon, Gingham Garden Designer Washi Tape, Decorative Label Punch, Extra Large Oval Punch, Paper Snips
Monday, October 21, 2013
Oh, Hello!
This is one of the cards that I made to send to one of my college roommates for her 40th birthday. I think she'll like it...at least I hope she does! I think that Oh, Hello and Gorgeous Grunge are a match made in stamping heaven. I love how these two sets work perfectly together. I'm also in love with this year's In Colors, especially Baked Brown Sugar, Crisp Cantaloupe, and Pistachio Pudding. And I am shocked by that last one. There really aren't words to describe how much I hate mint green. Remember Mint Medley? Oh, how I hated that color. I danced with joy when that retired. I think it's because as a child, the walls in my dentist's office were that color, and I absolutely hated going there. I had more things done to my mouth during my growing up years than any kid should have to endure. Unfortunately, I think my oldest daughter is following in my footsteps. It's much harder to watch your child go through that stuff than it ever was to endure it myself!
Anyway, my dental issues seem to have influenced how I feel about mint green, so I think you can understand why I was so shocked to realize that I really do love Pistachio Pudding! It's a more updated "mint" and not minty at all, which is probably why I like it.
Tips & Tricks
Stamps: Oh, Hello and Gorgeous Grunge
Ink: Sahara Sand, Baked Brown Sugar, Crisp Cantaloupe, and Pistachio Pudding
Paper: Baked Brown Sugar and Whisper White
Accessories: Big Shot, Ovals Collection Framelits, Simply Pressed Clay and Molds, Whisper White Baker's Twine
Anyway, my dental issues seem to have influenced how I feel about mint green, so I think you can understand why I was so shocked to realize that I really do love Pistachio Pudding! It's a more updated "mint" and not minty at all, which is probably why I like it.
Tips & Tricks
- Now that the novelty of the Simply Pressed Clay and Molds has worn off, I'm happy to report that I still use them all the time! The embellishments they add to any card are so affordable, and I love that they can be customized to match any project. The only negative is that you can only make three buttons or flowers at a time. But did you know that if you stick the molds in the freezer for about 30 minutes (in a deep freeze...a fridge freezer may take a bit longer), the clay will (temporarily) harden long enough to pop out of the mold? You can then set them aside to dry, and free up the mold for more clay.
- I always try to make extra buttons and flowers when I dye clay. I keep the extras in old embellishment containers (you know, those round containers that buttons, brads and other items come in.) It's a great way to reuse empty containers, and have beautiful embellishments ready for your next project!
Stamps: Oh, Hello and Gorgeous Grunge
Ink: Sahara Sand, Baked Brown Sugar, Crisp Cantaloupe, and Pistachio Pudding
Paper: Baked Brown Sugar and Whisper White
Accessories: Big Shot, Ovals Collection Framelits, Simply Pressed Clay and Molds, Whisper White Baker's Twine
Friday, August 23, 2013
Cardmaking for Kids, Part 3
This card is a variation on this one created by Elizabeth Price that I saw a few weeks ago. Um, mine has a bit more going on...notice how the title of hers is "LIGHT Layers"!!!!! Not exactly the case here!
I pulled out all kinds of retired colors for this card, but again, the possibilities are endless with this design. I've actually done a version in oranges, and I love it. This card is so easy to make, and really, there's no need to pull out the Stamp-a-ma-jig...it's not difficult to line up the skid mark stamp that is behind the butterflies, but there is no need to line those up perfectly anyway! Super easy, super cute!
Supplies
Stamps: Gorgeous Grunge
Ink: Smokey Slate, So Saffron, Pretty in Pink (retired), Pale Plum (retired), and Blush Blossom (retired)
Paper: Pretty in Pink (retired), Pale Plum (retired), and Blush Blossom (retired), and Whisper White card stock
Accessories: Elegant Butterfly Punch, Bitty Butterfly Punch, Glue Dots
Wednesday, August 21, 2013
Cardmaking for Kids, Part 1
Tomorrow I'm holding a cardmaking class for kids. I've already done one this summer, and it was a lot of fun. Of course having great kids attend is probably what made it so much fun for me. This time I'll have twice the number, so things should be interesting! But my own kiddos have promised to be my helpers, so what could possibly go wrong? (ahem)
Anyway, I thought I'd show off the cards we'll be making together. I have three goals when doing a class with kids: (1) make it fun, (2) keep it simple, and (3) use up as much retired product as possible! So while many of the projects I'll be showing are made with retired goodies, they can easily be reproduced using current items and colors.
This card uses Gorgeous Grunge, one of my new favorites. Since my class is full of tween girls, I knew I couldn't go wrong with rainbows. This one is super simple, as it's the same stamp in six different colors. I dug out one of my favorite retired sentiment sets, Simple Sayings II (I don't have Simple Sayings I...I wonder why? I must not have liked that one!) Honestly, it took me longer to pick the colors than it did to actually make this one.
Supplies
Stamps: Gorgeous Grunge, Simple Sayings II
Ink: Read Red, Pumpkin Pie, Summer Sun (retired), Wild Wasabi, Brilliant Blue (retired...sniff!), and Lovely Lilac (retired)
Paper: Whisper White and Lovely Lilac (retired) card stock
Monday, August 12, 2013
Gorgeous Grunge
Oops...I though that I had everything set so that this card would post while I was away on vacation, but somehow I messed up! Oh well, I'll share it now instead!
This was my second attempt at a card using Gorgeous Grunge and Yippee-Skippee together. I think I may have gone a bit overboard with the splatter stamps, but I just love them, and couldn't help myself! This card uses two of the splatters in the set. One of my most used stamp sets of all time is Itty Bitty Backgrounds, and the splatter was definitely my favorite. But I think this set is going to be a better replacement, since the splatters are big, not itty bitty! I used them on the background and on the butterflies, just to give the punched card stock a little bit of interest. I then popped the butterflies up a bit using glue dots. It's a great way to make an image stand out a bit more subtly than it would when using Stampin' Dimensionals.
Stamps: Gorgeous Grunge and Yippee-Skippee
Ink: Calypso Coral, Tangerine Tango, Crisp Cantaloupe, So Saffron, and Going Gray
Paper: Calypso Coral, Tangerine Tango, Crisp Cantaloupe, and Naturals White
Accessories: Elegant Butterfly punch, Bitty Butterfly punch, glue dots
Friday, August 2, 2013
Happy, Happy, Happy
If you're a fan of Duck Dynasty, this card doesn't really need any explanation. And if you aren't, well, you're just missing out. Watch it.
As soon as I ordered Gorgeous Grunge, this idea popped into my head. And then I had to wait over a week for the set to come. When it did, I had convinced myself that I wasn't going to be able to pull off the camouflage look, but I was beside myself with giddiness when it really did work. Just one splatter, randomly stamped with different colors really does look like camouflage. To get the happy, happy, happy sentiment, I simply inked my stamp with markers instead of an ink pad, then only stamped the word happy the second and third time. My trusty Stamp-a-ma-jig helped me to line it up perfectly. To finish it off, I snipped a couple of card stock feathers, and added the woodgrain embossed Core'dinations card stock strip. I'm thinking this is the perfect birthday card for my brother who is both a hunter and Duck Dynasty fan. I just have to remember that in a couple of months when it's time to send it.
Stamps: Gorgeous Grunge, Yippee-Skippee
Ink: Always Artichoke, Soft Suede, Early Espresso
Paper: Always Artichoke, Sahara Sand, Soft Suede, and Early Espresso card stock
Accessories: Big Shot, Woodgrain embossing folder, sanding block, linen thread, paper snips
Subscribe to:
Posts (Atom)