I love making Joy Fold cards. They are so easy, and yet so impressive to the recipient. They are definitely one of those "wow" cards that everyone things is so amazing, and you, the creator, know that it really wasn't that hard to make!
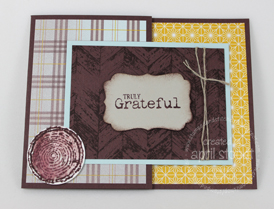
I thought it would be fun to show two different ways to make a Joy Fold card. The first way, shown above, is the traditional orientation for a Joy Fold card. But check out how it looks when you simply turn the card and have it open vertically, instead of horizontally. Fun, right?
I actually think I prefer the vertical version, simply because it gives a little more writing space inside the card. Not only do you have the inside of the square, but also the inside of the bottom flap. Then again, I don't always have a lot to say in a card, so for those times, I'd probably prefer the top version. :)
Supplies
Stamps: Thoughts & Prayers, So Sorry (retired)
Ink: Sahara Sand and Tangerine Tango markers
Paper: Sahara Sand and Very Vanilla card stock, Sweater Weather DSP (retired)
Accessories: Simply Scored Scoring Tool
Showing posts with label Joy Fold Card. Show all posts
Wednesday, November 19, 2014
Tuesday, August 19, 2014
Nuts About You Joy Fold Card
I have had so much fun with the Nuts About You hostess set. It's just so cute. This card is a joy fold card turned on it's side. The grass is what keeps the first flap closed, and I love how it looks cute and is functional all at the same time!
I'm keeping it short and sweet today...I hope you'll forgive my brevity. I'm hoping to get back into a more regular posting routine now that school is starting and (hopefully) life will settle down a bit. Does that make any sense at all? Isn't summer supposed to be a time to relax before the hectic school year? Apparently that's not the case for my life!
Supplies
Stamps: Nuts About You
Ink: Wild Wasabi, Soft Suede, Early Espresso, and Basic Gray
Paper: Garden Green, Whisper White, Wild Wasabi, and Soft Suede card stock, Gingham Garden DSP
Accessories: Big Shot, Fringe Scissors, Linen Thread, 3/4" Circle Punch
Monday, August 26, 2013
Cardmaking for Kids, Part 4
Ah, the last of the cards from my kids' cardmaking class last week. This one was a bit more involved, but since I cut and scored all the pieces ahead of time, my lovely group of girls did a great job making this Joy Fold card. I've listed the measurements for the card here, in case you'd like to give it a try.
This Designer Series Paper was a SAB selection a few years ago, and I absolutely loved it. I still have a full pack left. Not that I'm a hoarder or anything. All of these papers look great together, so it was the perfect choice for a card that required three different prints! I love that the heart from the coordinating stamp set matches the paper perfectly!
Stamps: Polka Dot Punches (retired), Thank You Kindly (retired)
Ink: Sahara Sand, VersaMark
Paper: Bliss Blue (retired) and Certainly Celery (retired) card stock, Delicate Dots DSP (retired)
Accessories: Full Heart Punch, Heat Tool, White Embossing Powder
Monday, August 19, 2013
Truly Grateful Joy Fold Card
I've been wanting to do a Joy Fold Card at club for a long time. I've had the instructions printed out and sitting on my desk for probably a year. And when I sat down and thought about what to make this month, I realized that Truly Grateful was the perfect set for such a card.
I like making cards with unusual folds...it keeps the recipient on their toes. And it's always good to try new things, simply for the challenge of doing something new and different. I've said before how I love Sweater Weather and Truly Grateful together, because they both just scream fall to me. But since it's only August, I didn't want to make this card be too fall-ish...it's still summer, after all! So the lighter tones in this particular plaid were perfect for this card. I would never have thought to pair Crushed Curry and Soft Sky together on my own, but I LOVE how they look together! See, another new thing for me to try!
In case you aren't familiar with Joy Fold cards, here's how they look when opened:
The layers unfold to create a really interesting card. The little wood slice on the front is adhered with a Stampin' Dimensional, so that the smaller flap can be tucked in behind it to keep it secure.
Tips & Tricks
- Use a Stamp-a-ma-jig! That's how I was able to line up the woodgrain image...it's not big enough on it's own and needs to be stamped twice. I'm pretty good at eye-balling, but this one requires the SAMJ!
- Stamping Chocolate Chip ink on watercolor paper or Naturals White card stock allows you to watercolor without additional ink! Just use an Aquapainter and pull ink from the image you've stamped. It's OK for the image to bleed this time!
- Chocolate Chip (card base) ~ 4 1/4" x 8 1/2"; score at 5 1/2"
- Soft Sky ~ 3" x 8"; score at 4"
- Crushed Curry DSP ~ 4" x 5 1/4"
- Plaid DSP ~ 4" x 2 3/4"
- Chocolate Chip (top layer) ~ 3 3/4" x 2 3/4"
- Stamps: Truly Grateful
- Ink: Chocolate Chip
- Paper: Chocolate Chip, Soft Sky, and Naturals White card stock, Sweater Weather Designer Series Paper
- Accessories: Aquapainter, 1 3/8" Circle Punch, Simply Scored Tool, Decorative Label Punch, Linen Thread, Sponge
Subscribe to:
Posts (Atom)