I thought it was high time I popped in here to mention that yes, I'm still alive, and to explain where the heck I've been for the past four months. :) If you know me in real life, you know the past couple of years have been jam packed with a lot of loss and some pretty hard stuff. Just life, but it all seemed to happen in a fairly condensed period of time. And very little of it was (is) good, with one glaring exception. Since January, we've been working our tails off to get our house ready to sell, and finally (FINALLY!) it's on the market. This has been a dream for a long, long time, and the prospect of moving is so exciting to us. But with all that tough stuff and hard work, something had to go. Actually more than one something, but for the point of this post, blogging had to go. I just needed to take a break to focus on other things. And in all honesty, I haven't been feeling overly creative lately anyway.
I do have a pile of cards waiting to be photographed and posted, and hopefully that will happen soon. But I can't make any promises--who knows, maybe my house will sell tomorrow. :) When things settle down a bit, I'm planning to begin blogging regularly, but for now, my energies are being directed toward other areas. For those of you who have emailed and asked me if everything was OK and wondered where I was, thank you.
I'm still planning on holding events, so know that I do have some things in the works! And hopefully soon, I can show off all kinds of pictures of my new stamping space, wherever that may be!

Tuesday, April 28, 2015
Thursday, December 25, 2014
Merry Christmas!

I think the only thing I changed was to put the wreath and the gold and black layers on a Cherry Cobbler card base, instead of a Basic Black base. The black was stunning, but I love the Cherry Cobbler. It's also easier to write on the inside and have it show up. :)
The wreath is embossed with gold embossing powder and I used Cherry Cobbler Dazzling Details for the berries.
Supplies
Stamps: Wonderful Wreath, Good Greetings
Ink: Gold
Paper: Cherry Cobbler and Basic Black card stock, Gold Foil sheet
Accessories: Big Shot, Wondrous Wreath Framelits, Cherry Cobbler Seam Binding Ribbon, Cherry Cobbler Dazzling Details
Merry Christmas, everyone! I hope this day is full of joy and celebrating the Greatest Gift!
Wednesday, December 24, 2014
Bright & Beautiful Shaker Card

I've never made a shaker card before, but I'm hooked. It is so easy. I can't wait to make more!
Tips & Tricks
- To make this shaker card, I stamped the medium star from Bright & Beautiful, then cut it out with the coordinating Stars Framellits.
- Next, I punched a circle in the center of the star.
- I then cut out a larger circle in whisper white and stamped the smallest star in Lost Lagoon.
- I also cut out a larger circle from a piece of Window Sheet.
- Adhere the Window Sheet to the back of the star, and set aside to dry.
- Then, take one of the foam circles from the Shaker Frames, and adhere it to the Whisper White circle. These are great, because you'll get six sets of foam circles in different sizes to make tons of shaker cards! Think Stampin' Dimensionals, only in circle form.
- Before you remove the backing off the top of the Shaker Frames, put some glitter or other filler into the circle. I just used glitter, but if you have the Star Confetti Punch, you could punch some little stars in different colors and put those in. Or, do a combination of both!
- Remove the adhesive backing, and set the large star on top of the Whisper White/Shaker Frames piece.
- That's is, now you have the hardest part done! And it wasn't even that hard!
- To finish this card, I placed some Soft Sky card stock and All is Calm DSP on the front of a Lost Lagoon card base. I tied a piece of Soft Sky Seam Binding Ribbon where the two papers meet, stamped "Merry Christmas" at the bottom, and then adhered my star to the front.
If you haven't made a shaker card, what are you waiting for? Don't wait as long as I did...these are so fun!
Supplies
Stamps: Bright & Beautiful, Good Greatings
Ink: Lost Lagoon
Paper: Lost Lagoon, Soft Sky, and Whisper White card stock, All is Calm DSP, Window Sheets
Accessories: Big Shot, Stars Framelits, 1" and 1 1/4" Circle Punches, glitter
Wednesday, December 10, 2014
Frozen Snowflake Card


Stamps: Letterpress Winter
Ink: Lost Lagoon, Whisper White
Paper: Soft Sky card stock, Dazzling Diamonds Glimmer Paper
Accessories: Big Shot, Snowflake Card Thinlits
Monday, December 8, 2014
Bright & Beautiful Christmas Card
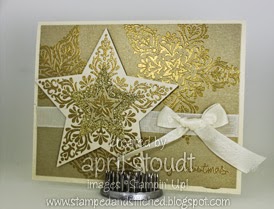
This gold star card is a little bit involved. It's not hard, but there are a lot of steps, and trying to perfectly place the largest star from the Bright & Beautiful stamp set is a little tricky because of the giant wood block it's mounted on.
Every star on this card is embossed with gold embossing powder, and I love the way it looks. The middle layer of the focal star is cut from gold glimmer paper. There is so much sparkle and shine on this card, and even though I don't normally love gold, I love this card.
Supplies
Stamps: Bright & Beautiful, Good Greetings
Ink: Gold
Paper: Naturals Ivory and Brushed Gold card stock, Gold Glimmer paper
Accessories: Big Shot, Stars Framelits, Very Vanilla Seam Binding Ribbon, Heat Tool, Gold embossing powder
Friday, December 5, 2014
Simple Endless Wishes Card

I don't think this card really needs an explanation, but I do want to point out the dot of Cherry Cobbler Dazzling Details in the center of the snowflakes. It gives just a little pop to an otherwise flat (but super cute!) card.
Supplies
Stamps: Endless Wishes
Ink: Crumb Cake and Cherry Cobbler
Paper: Crumb Cake and Cherry Cobbler card stock, Trim the Tree DSP stack
Accessories: Cherry Cobbler Dazzling Details, Cherry Cobbler Baker's Twine
Wednesday, December 3, 2014
Quilted Gingerbread Christmas

To make this card, I simply punched out six different patterns of DSP with my square punch. I adhered them to a piece of Garden Green card stock, then ran it through my Big Shot using the Argyle embossing folder. I also love the now-retired Square Lattice embossing folder, but when I made this card, I wanted to use something current. While nothing gives a quilted look the way the Square Lattice folder does, the good news is that the Argyle folder is a great alternative.
I used an old (but much loved!) stamp set called Gingerbread Christmas, and colored in the image with Aquapainters and ink. I punched it out with the Decorative Label punch, added some seam binding ribbon, and that's it! I did offset the quilted piece intentionally, but as I study the picture, I think it might look better if it's centered. If you try it that way, I'd love to see a picture!
Supplies
Stamps: Gingerbread Christmas (retired)
Ink: Garden Green and Real Red ink, StazOn Jet Black ink
Paper: Real Red, Garden Green, and Naturals Ivory card stock, Holly Berry Bouquet DSP
Accessories: Big Shot, Argyle embossing folder, Decorative Label punch, Very Vanilla Seam Binding Ribbon
Subscribe to:
Posts (Atom)