Thursday, February 28, 2013

Just Believe


This is a special card, because I made it for a special person. :)  My friend asked me to make some cards for her, and when she does that, I almost always go with her favorite color, purple.  She specifically mentioned including some kind of plants as well as some sort of insects.  The butterfly choice was a no-brainer, and it took me all of about two seconds to decide on using the Just Believe set, one of my absolute favorites.

There are several layers to this card, staring with a base of Naturals Ivory, followed by a layer of Perfect Plum, embossed with the Square Lattice Embossing Folder.  The next layer uses a veeeeeery old background stamp that is very similar to En Francais, so let's pretend that's what I used. :)  Next is a piece of Very Vanilla, stamped with the gorgeous flower image from this set.  It's not really showing up well in the picture, but I sponged the edges with Always Artichoke.  Then to top it all off, is that one lovely little butterfly from Papillion Potpourri, stamped in Elegant Eggplant on Perfect Plum cardstock and punched out with the new Bitty Butterfly punch.  The finishing touches include the Always Artichoke seam binding ribbon and the the Dazzling Details glitter adhesive in the centers of the flowers.

Stamps:  Just Believe (116948), Papillion Potpourri (123757)
Ink:  Elegant Eggplant Classic Ink (126969), Always Artichoke (119701), Perfect Plum (119700), and Elegant Eggplant (119701) Stampin' Around Markers
Paper:  Elegant Eggplant (105126), Perfect Plum (101889), Naturals Ivory (101849), and Very Vanilla (101650) card stock
Accessories:  Always Artichoke Seam Binding Ribbon (121000), Dazzling Details (124117), Big Shot (113439), Square Lattice Embossing Folder (119976), Labels Collection Framelits (125598), Bitty Butterfly Punch (129406)

Tuesday, February 26, 2013

Pennant Parade

I'm on a bit of a Pennant Parade kick this week.  This card is so simple to make, and part of the reason is because there is no cutting by hand involved (yay!)  The coordinating Petite Pennants Builder Punch makes cutting out these pennants a breeze!  I also cut out the happy birthday banner with the Bitty Banners Framelits.  I seriously think this card took all of ten minutes to create.  So easy, and the non-traditional size adds interest.

I love the color combination used here:  Garden Green, More Mustard (one of my all-time favorites!), and Elegant Eggplant.  When in doubt about a color combination, know that if the colors all come from the same collection (this time, the Regals) then generally it's a good bet.  And you can always throw in a neutral or two to add balance.

Stamps:  Pennant Parade (122740), Itty Bitty Banners (126255)
Ink:  Garden Green (126973), More Mustard (126964), and Elegant Eggplant (126969) Classic Ink, Whisper White Craft Ink (101731)
Paper:  Sahara Sand (121043), Whisper White (100730), Garden Green (102584), More Mustard (100946), and Elegant Eggplant (105126) card stock
Accessories:  Very Vanilla 1/8" Taffeta Ribbon (119960), Rhinestones Basic Jewels (119246), Big Shot (113439), Bitty Banners Framelits (129267), Square Lattice Embossing Folder (119976), Petite Pennants Builder Punch (122361)

Monday, February 25, 2013

Oh Hello Chalkboard

If you spend any time on Pinterest, you know that chalkboards are really trendy right now.  I've wanted to make a chalkboard card for a while, and finally sat down to play this weekend.  This is a very simple card, but it turned out almost exactly how I had envisioned it in my head.  I love it when that happens.

To give it that chalkboard look, simply smudge a bit of Whisper White craft ink in a few random spots on a piece of Basic Black card stock.  I used a little piece of flannel, but a sponge dauber would probably work great!  The sentiment is embossed with Whisper White embossing powder.  So simple...I think this is going to be a card we make at club next month!

Also, I'm loving this color combination.  I have been in such a rut and not feeling very creative lately.  I've also found myself gravitating toward my old standby color combinations and knew I needed some variety.  I sat down and looked through the catalog to find some combos that jumped out at me.  This was one of them (see page 35).  It actually also had Old Olive with it, but it just didn't look right to me on this card, so I left it out.  I only made it half way through the catalog and have a pretty big list of different color combinations to try out.  Check back to see what one I pick next. :)

Stamps:  Pennant Parade (122740), Oh Hello (130730)
Ink:  Whisper White craft ink (101731)
Paper:  Summer Starfruit (12639), Pool Party (122924), Soft Suede (115318), and Basic Black (121045) card stock
Accessories:  Petite Pennant Builder Punch (122361), Whisper White Stampin' Emboss Powder (109132), Heat Tool (129053), Whisper White Baker's Twine (123262)

Friday, February 22, 2013

Papillion Potpourri Double Embossing Technique

Double embossing...it's such a gorgeous technique, and I've wanted to try it for a very long time.  I finally decided to give it a shot, and honestly, it was so easy.  Why did I wait so long?   I can't wait to sit down this weekend and try it with different combinations of embossing folders.

I so wish I could take credit for this card, but I can't.  I CASEd the whole thing from Pat Coombes, a Stampin' Up! demonstrator in the UK.  Click here if you'd like to follow her tutorial on how to double emboss. 

Stamps:  Papillion Potpourri (123757), Itty Bitty Banners (126255)
Ink:  Soft Suede Classic Ink (126978)
Paper:  Soft Suede (115318) and Naturals Ivory (101849) card stock
Accessories:  Big Shot (113439), Fancy Fan Embossing Folder (127751), Designer Frames Embossing Folders (123130), Bitty Banners Framelits (129267), Elegant Butterfly punch (127526), Pearls Basic Jewels (119247)

Thursday, February 21, 2013

Jelly Beans in a Jar {Spring Sampler}

I've obviously been playing with my Spring Sampler set. :)  This card uses the jelly bean stamp in the set, and I'm telling you, every single stamp in this set is ADORABLE.  So much cuteness in this set!

While I used a couple of sets of Framelits to cut out some of the elements on this card, there was also some hand cutting involved.  I wanted the jelly beans to have some dimension, so I cut several individual jelly beans out and popped them up with little pieces of Stampin' Dimensionals.  And since the weather has just been gray, gray, gray, I wanted lots of bright colors on this card.  I easily achieved this by coloring each jelly bean a different color using my markers right on the rubber (there are three jelly beans on the stamp.)

Are you a fan of jelly beans?  I am, but I'm super-picky.  I do NOT like the spice ones.   A couple of years ago I found some in the bulk section of the grocery store that are naturally colored.  Not only were the soft colors beautiful, they were the best jelly beans I've ever had.  And of course then the store stopped carrying them. :( Obviously, I should just stick with chocolate.


Stamps:  Spring Sampler (125510), Perfectly Preserved (126690), Itty Bitty Banners (126255)
Ink:  Melon Mambo (119702), Tangerine Tango (119702), Daffodil Delight (119677), Wild Wasabi (119700), Tempting Turquoise (119702), and Rich Razzleberry (120970) Stampin' Around Markers
Paper:  Summer Smooches Designer Series Paper (125409), Melon Mambo (115320), Rich Razzleberry (115316), Wild Wasabi (108641), Tempting Turquoise (102067), and Whisper White (100730) card stock
Accessories:  Big Shot (113439), Bitty Banners Framelits (129267), Cannery Collection Framelits (127822), Perfect Polka Dots Embossing Folder (117335), Daffodil Delight 1/8" Taffeta Ribbon (119254), Scallop Edge Border Punch (119882), Rhinestones Basic Jewels (119246)

Wednesday, February 20, 2013

Spring Sampler

It has been so gray and yucky around here lately...I'm sooooo over winter.  I'm ready for spring!  While it is bright and sunny out today, it was not when I made this card yesterday!  I had to find some way to bring some cuteness to a dreary day, and the Spring Sampler stamp set was just the ticket.  This is such an adorable set...even the rain boots and umbrellas are cute!

This card is a little 3"x3" notecard, perfect for tucking in with a little gift.  I colored the images with my markers, then punched them out with a circle punch, adding a Basic Gray circle behind it.  The buttons are from the Brights and Neutrals collections, plus one little retired white button.  I tied Whisper White Baker's Twine in the holes, but didn't want to have white on white.  Did you know that you can dye our ribbon and Baker's Twine?  It's so simple.  I simply pushed down on the twine while running it over the Basic Gray ink pad a few times.  It's good to use some scrap paper or a sponge dauber if you don't want to get ink all over your fingers. :)

Stamps:  Spring Sampler (125510), Pennant Parade (122740)
Ink:  Basic Gray Classic Ink (126981), Basic Gray (119703), Basic Black (100082), and Tempting Turquoise (119702) Stampin' Around Markers
Paper:  Basic Gray (121044), Whisper White (100730), and Tempting Turquoise (102067) card stock
Accessories:  Cloudy Day Embossing Folder (127022), Big Shot (113439), 1" Circle Punch (119868), 1 1/4" Circle Punch (119861), Bitty Banners Framelits (129267), Brights Designer Buttons (119747), Neutrals Designer Buttons (119743), Whisper White Baker's Twine (124262)

Monday, February 18, 2013

Easy Gift Giving

I thought I'd show you what my daughter made to hand out as valentines this year.  Cute, huh?


These little bookmarks were so simple to make.  We used the Two Tags Bigz Die and my Big Shot to cut out the bookmarks in Pretty in Pink, then she punched out some scallop circles, using up some of my retired Designer Series Paper.  On top of that was a single sparkly red heart, cut with the littlest heart in the Hearts Collection Framlets and some red glimmer paper.  We finished them off with some retired pink ribbon.  They were a piece of cake for a child to mass-produce.  Oh, and on the back she stamped "Happy Valentine's Day" and signed her name.  So easy, and so cute.

Remember how I mentioned that Valentine's Day is practically non-existent in my home?  Well, I did have a last minute thought to wrap up one of these DVDs that I had stashed away.  Since our whole family loves them, it wasn't just a gift for the kids.  Due to lots of food allergies, we don't do candy, so this was a good option.

I wanted to wrap it up in a cute way, but had no appropriate paper or gift bags.  What I did dig up was some kraft colored tissue paper, which is super-simple to magically turn into wrapping paper for any occasion.  This time, I grabbed a retired jumbo wheel and ran it down the front of the DVD after I had wrapped it.  You could most definitely get more elaborate with a wheel, decorating the entire sheet before wrapping.  But I wanted to keep it simple.  I grabbed some retired red ribbon and tied a simple bow.  My kids then fought over who would get to keep the ribbon. :)  They hoard craft supplies, despite my best efforts to curb this habit. (My husband recently found that they had been stashing empty toilet paper tubes under one of the bathroom sinks!)

Thursday, February 14, 2013

Happy Valentine's Day!

I'll admit, this day is sooooo not a big deal in my house.  I usually try to do something fun for the kids, but that's about it.  But hey, if you celebrate today, have fun!

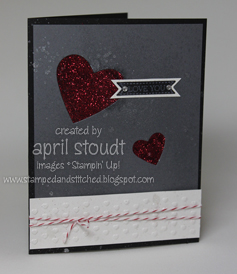
Do you ever have an idea for a card that looks great in your head, but just doesn't translate to paper in quite the same way?  Yeah, this card would be a prime example of that.  It just didn't turn out quite how I had planned, and everything I did to jazz it up fell a little flat.  But there are some great elements on it, so let's talk about those. :)

The hearts...I'll be you're thinking that's red glimmer paper.  And that would have been a far easier way to make this card.  But that's not what's going on here.  I placed  couple of my Hearts Collection Framelits on the Basic Gray cardstock.  Once the holes were created, I stuck a piece of packing tape to the back, then sprinkled some (very old) red glitter on the sticky side of the tape.  It's a pretty cool technique, and given the amount of retired glitter I have, I should be using this technique a lot more.

The little strip of hearts at the bottom...I simply sent a strip of Naturals White card stock through my Big Shot using the Adorning Accents Embossing Folders, then tied a piece of Cherry Cobbler Baker's Twine around it (I love that stuff...I will cry if SU! ever retires Baker's Twine!)

Stamps:  Itty Bitty Banners (126255)
Ink:  Whisper White Craft Ink (101731)
Paper:  Basic Black (121045), Basic Gray (121044), Naturals White (102316) card stock
Accessories:  Big Shot (113439), Hearts Collection Framelits (125599), (129267), Adorning Accents Embossing Folders (125601), Rhinestones Basic Jewels (119246), Cherry Cobbler Baker's Twine (123125), red glitter (retired)


Wednesday, February 13, 2013

Paper Pumpkin Journal

How cute is this journal?  Don't you just love it?  Well, you can have one of your very own!  This is one of the projects from Paper Pumpkin, and it took me less than ten minutes to make this (that included putting the two clear mount stamps together!)  It was such a fun project to make, and while I made it exactly as the sample showed, there are no rules...you can make it exactly as you want.  If you're feeling creative, go crazy and do something totally unique to you.  And if you aren't (I wasn't!), just follow the instructions.  Easy as pie!

You can have a great project like this show up at your door EVERY MONTH by signing up for Paper Pumpkin here.  It's only $19.99 per month (free shipping!!!!)  Don't forget to add my name as your demonstrator! :)

Monday, February 11, 2013

Circle Circus Inspiration

Who would think that hotel artwork would inspire a card?  When I was in Orlando for the Stampin' Up! Leadership Conference, this artwork was in the hallway in our hotel.  As soon as I saw it, it reminded me of Circle Circus.   I had to make a card as soon as I got home (and then promptly forgot to post it!)
I made this one just relying on memory, which didn't prove to be very good, since I got the colors all wrong.  But that's OK, because inspiration is just that, inspiration.  It's a jumping off point to creativity, not something that needs to be replicated exactly.  But it is kind of bugging me that the colors aren't the same, so I may have to try again. :)

Stamps:  Circle Circus (115778), Best Dad Ever (120399)
Ink:  VersaMark (102283), Early Espresso (126974), More Mustard (126964), Soft Suede (126978)
Paper:  Crumb Cake (120953), Early Espresso (119686), More Mustard (100946), and Very Vanilla (101650) card stock
Accessories:  Early Espresso Embossing Powder (128980), Heat Tool (129053), 1" Circle Punch (119868), Sponge Daubers (102892), Crumb Cake Seam Binding Ribbon (122332)

Saturday, February 9, 2013

What's New at Stampin' Up!


Celebrate 25 years of Stampin' Up! with February's Best of Love stamp set.

Available for a limited time only, these products can be purchased individually or as a bundle.


Paper Pumpkin
Sign up now for Stampin' Up!'s monthly subscription.  You'll receive a great new project every month.  Click here for details.


All new single stamp selections!  Click below to see the incredible selection of brand new single stamps! Available for a limited time only!


Dude, You're Welcome! 
Designed for men, but great for anyone, especially if you love clean and simple cards.


Sale-a-Bration
My favorite promotion of the year!  For every $50 you spend, pick one item from the SAB catalog for FREE!

Friday, February 8, 2013

Card Swaps

A couple of weeks ago, I got together with some other demonstrators at my friend Kelly's house.  We weren't a large group, but we still had fun meeting and stamping together.  Here's a picture of the card Kelly designed for us to make together:
 designed by Kelly DeTommaso

This was a fun technique, and it's always nice to get to sit and stamp with others.  But we didn't just stamp, we also swapped cards...and they were all beautiful!
by Michele Gibbs
by Alison Bilohlavek

Kelly also swapped cards with us, but apparently I never took a picture of it!  Sorry, Kelly! :)

Thursday, February 7, 2013

Friendly Phrases Pinwheel

I promise that I really hadn't planned on making yet another square card but when I sat down to make this it's just what happened.  Do you ever have an idea in your head, but when you sit down to create, you end up with something completely different?  That's exactly what happened with this card.  I was originally going to use a frog stamp on this, which is why I chose these colors.  But as got further and further along, I knew I was going to need to save the frog for another card.  What I did want to do is use my clear blocks as stamps, and at least that part worked!

I definitely found that the new foam ink pads work much better with this technique than the old felt pads.  And it's simple...just ink up the block, then press down (hard).  I loved how the mosaic pattern turned out, although I was surprised at how light Daffodil Delight turned out compared to how dark Pumpkin Pie did (both of those were the old felt pads.)  The Lucky Limeade blocks turned out exactly as I hoped.

I also had fun using some new items from the Spring Catalog...the Pinwheel Sizzlet and the Needlepoint Border Embossing Folder.  I love them both!  And the best part...they are both such an inexpensive way to add some pizazz to any card!

Stamps:  Friendly Phrases (126149)
Ink:  Lucky Limeade (126984), Daffodil Delight (126944), and Pumpkin Pie (126945) Classic Ink
Paper:  Naturals White (102316),  Lucky Limeade (122926), and Daffodil Delight (119683) card stock
Accessories:  Big Shot (113439), Pinwheel Sizzlet (129411), Needlepoint Border Embossing Folder (129383), 119683 (119741), Pumpkin Pie 1/4" Grosgrain ribbon (retired), Clear Block A (118487), and Clear Block D (118485)

Wednesday, February 6, 2013

You Are My Sunshine, Sunny Day Edition

Yup, another 4"x4" card today. :)  This is the second card I made for my girls with the Sunshine single stamp.  This will be the favorite and whichever child doesn't get this one is going to be disappointed.  But the other one is definitely my favorite. 

If I had it to do over, I'd probably place the rainbow rays a little differently.  I don't like how they come to a point at the corners, but since I trimmed them after adhering them to the card front, I didn't think about it ending up like that.  I'd just move them so they fall on either side of the corner points.  But it's a great way to use up scraps of card stock! 


Stamps:  Sunshine (132671)
Ink:  Real Red (126949), Tangerine Tango (126946), Pumpkin Pie (126945), Daffodil Delight (126944), Old Olive (126953), Pacific Point (126951), Rich Razzleberry (126950), and Melon Mambo (126948) Classic Ink, Jet Black Staz-On Ink (101406)
Paper:  Watercolor Paper (122959), Naturals White (102316), Real Red (102482), Tangerine Tango (111349), Pumpkin Pie (105117), Daffodil Delight (119683), Old Olive (100702), Pacific Point (111350), Rich Razzleberry (115316), and Melon Mambo (115320)
Accessories:  Rhinestone Basic Jewels (119246),  Aquapainter (103954)

Tuesday, February 5, 2013

So Sorry


Can you tell I'm really into making little 4"x4" cards lately?  For some reason, I'm enjoying the square card over rectangle.  Maybe later this week I'll have something other than a square card. :)

I recently got the So Sorry stamp set, and it's so beautiful.  I know that sounds weird, considering the set consists only of words.  But I love the scripted type style and think it's really pretty.  And with lots of options for finishing that thought, it's very versatile.  I chose just to stick with So Sorry, and I guess when I need to send this type of card, I'll finish the sentiment on the inside.  Hopefully I won't have a need to send this for a long time, though.

The butterflies from Papillion Potpourri coordinate perfectly with the two butterfly punches that Stampin' Up! carries.  I stamped them with Staz-On ink, then punched them out.  The punches work great even with watercolor paper.  I chose to watercolor after I punched, but you could easily do it before.  I'll admit that I may have ruined this card when I spritzed ink on the sentiment.  I was so upset, but after it dried, I decided to keep it.  I'm on the fence about how I feel about all that brown on there...it wasn't the look I was going for!  I highly recommend doing a test spray BEFORE spraying your project!  At least the speckling worked in the upper right hand corner of the card!

Stamps:  Papillion Potpourri (123757), So Sorry (126525)
Ink:  Jet Black Staz-On (101406), Early Espresso (126974), Tangerine Tango (126946), So Saffron (126957), Perfect Plum (126963), and Elegant Eggplant (126969) Classic Ink
Paper:  Crumb Cake (102953), Early Espresso (119686), and Naturals Ivory (101849) card stock, Watercolor Paper (122959)
Accessories:  Window Frames Framelits (129021), Big Shot (113439), 5/8" Crochet Trim (118481), Aquapainter (103954), Elegant Butterfly Punch (127526),  Bitty Butterfly Punch (129406), Festive Paper-Piercing Pack (127857), Paper-Piercing Mat (126199), Paper-Piercing Tool (126189)

Monday, February 4, 2013

You Are My Sunshine...When Skies Are Gray


When my girls were babies, I sang this song to them all the time.  ALL the time.  I still sing it to them sometimes, especially when they are feeling sad or having a hard time going to sleep.  So when I saw this as one of the new single stamp options, I HAD to get it. 

I'm still having issues with my arm, so I didn't get a lot of stamping done this weekend.  But I did make two little 4"x4" cards using this stamp, one for each of my girls.  This one is so simple...I think it took me all of ten minutes to make, but I love it, because it just matches the song perfectly.  My girls are going to be so excited when I give them these cards.  They love the song, too, but mostly, they just love it when I give them cards (which I don't do nearly enough!)

Stamps:  Sunshine (132671)
Ink:  Jet Black Staz-On Ink (101406)
Paper:  Daffodil Delight (119683), Basic Black (121045), and Basic Gray (121044) card stock
Accessories:  Big Shot (113439), Cloudy Day Embossing Folder (127022), Neutrals Designer Buttons (119743), Daffodil Delight 1/4" Stitched Grosgrain Ribbon (126872), Whisper White Baker's Twine (124262)

Saturday, February 2, 2013

Easter Countdown Class

I always enjoy finding ways to make holidays more meaningful for families, and my favorite way to do that is with beautiful paper crafting projects.  And because of my Christian faith, these projects frequently focus on passages from the Bible.

This year, I've designed an Easter countdown in the form of a little free-standing flip book.  This book will contain 18 pages, each focusing on a different Old Testament prophesy regarding Easter:  the events leading up to and including Jesus' death and resurrection.  The countdown will last for 18 days, beginning on March 14 and ending on Easter Sunday (March 31, 2013).

You'll notice that there are blank white spaces on each of the pages shown...each of those will have an Old Testament scripture reference for the prophecy, as well as the New Testament reference showing the fulfillment of the OT prophesy.  This is a great way to focus on the meaning of Easter in the days leading up to it.  It's great for adults to read on their own, but it's also very kid/family friendly, because there aren't long passages, just a few Bible verses to read each day. 

The cost for this class will be $25, and will include everything you need, even adhesive.  :)

If you love the look of this project but don't happen to share my faith, you are more than welcome to come, and I'll provide you with blank white spaces (just like in these pictures!) where you can fill in with your own photos, memories, or thoughts (like a journal or mini-scrapbook).  If you are interested in attending, please see the details below.


Date:  Saturday, March 2
Time:  1-5 pm
Location:  April's House (directions available upon registration)
Cost:  $25
RSVP:  Pre-payment by February 18 is required to reserve your spot (contact me at a_l_stoudt@yahoo.com to make arrangements)

***Please note...while this is a great activity to read through with your children, this class is for adults only.  Please make other arrangements for your children while you are at this class, as I can not accommodate them in my home.***

If you have any questions, please feel free to contact me!

Love to Travel? Pack Your Bags!


Okay, not your travel bags-but your crafting bags! Stampin' Up! is offering a special limited-time stamp set and Designer Series Paper that's all about travel. The Sent with Love Stamp Set and Designer Series Paper are perfect for documenting family vacations, creating unique invitations, or myriad other fun paper-crafting projects!

Today through April 30, you can purchase the Sent with Love Stamp Set (clear-mount only) or the Sent with Love Designer Series Paper.  Or, (even better!) you can purchase a bundle (132851) at a 20% discount ($25.50)!  It even includes Calypso Coral Baker's Twine.  The Sent with Love Stamp Set (131847, $17.95) and Sent with Love Designer Series Paper (132182, $19.95) are only available during this special offer. After April 30, they'll both fly away!

In addition, you may purchase the Sent with Love Digital Kit (item 132914; $9.95), which is not included in the bundle.


Friday, February 1, 2013

Love You {Perfectly Preserved}

Happy February!  What better way to kick off the month than with hearts on a card?  This simple card makes use of one of my very favorite sets, Perfectly Preserved.  I love that jar.  LOVE it.  And the coordinating Framelits make it easy as pie to cut out.  Mmmmm, pie.  I love that too.  Anyway, I punched out a bunch of Cherry Cobbler and Pink Pirouette hearts to fill up the jar.  It's hard to see in the picture, but the Cherry Cobbler card stock has been embossed with the Square Lattice embossing folder and my Big Shot. 

Speaking of not being able to see things...I apologize for the less-than-ideal picture.  I've been experimenting with a new light box, and it's not making me happy. I'm hoping to iron out all the photography kinks this weekend and have some great photos by Monday. :)  

So, back to the card...a couple of banners, courtesy of the Bitty Banners Framelits, add interest to the sentiment.  I think I'll give this card to my husband, especially since he's stopping to get ice cream on his way home tonight.  If there's one thing I love more than pie and that jar, it's ice cream.  Oh wait, I actually love my husband more than all of them. :)


Stamps:  Perfectly Preserved (126690), Itty Bitty Banners (126225)
Ink:  Early Espresso (126974) Classic Ink and Whisper White (101731) Craft Ink
Paper:  Naturals White (102316), Cherry Cobbler (119685), Pink Pirouette (111351), and Early Espresso (119686) card stock
Accessories:  Cherry Cobbler Baker's Twine (123125), Small Heart Punch (117193), Cannery Collection Framelits (127822), Bitty Banners Framelits (129267), White Stampin' Emboss Powder (109132), Heat Tool (129053), Square Lattice Embossing Folder (119976), Big Shot (113439)