Showing posts with label Paper Piercing Tool. Show all posts

Friday, April 25, 2014

Friendship Preserves Label {Retiring Products}


I'm sad that Friendship Preserves is retiring, but honestly, I'm not surprised.  I was shocked when it carried over last year, so I guess I got a bonus year out of it.

I thought it would be fun to make a tag with this stamp set...one that could be added to a jar of jam and given as a gift.  I do a lot of canning, and really should give more of it at Christmastime.  I'll have to keep that in mind.

Tips & Tricks
  • Did you know that the 2 1/2" Circle punch is the perfect size to fit the lid of a regular mouth canning jar?  I just chose a gingham print from the Gingham Garden Designer Series Paper and punched it out.  So simple!
  • I used Island Indigo Baker's Twine to tie the tag on, because it perfectly matches the Island Indigo gingham paper.  If you love Island Indigo, be sure to grab the Baker's Twine, as it's retiring.

Supplies

Stamps:  Friendship Preserves
Ink:  Versamark
Paper:  Pear Pizzazz and Naturals White card stock, Gingham Garden DSP
Accessories:  Big Shot, Window Frames Framelits, Paper Piercing Tool and Mat, Festive Paper Piercing Pack, Heat Tool, Clear Embossing Powder

Wednesday, January 8, 2014

Button Buddies Birthday

This is a card for a very special girl, who turned 14 yesterday.  I've known her since she was two, and it's hard for me to believe that she's really as old as she is.  I gave a similar card to her mom a few months ago, and it's still hanging on their refrigerator.  A little birdie told me that she frequently looks at the card and comments on how she wished it was hers.  So I made one that's not a duplicate, but is similar, and hopefully she loves it. 

Tips & Tricks

  • Paper piercing adds a lovely "finishing" touch to a card element, and I love that the Festive Paper Piercing Pack coordinates with Labels Framelits.  The holes are spaced perfectly, and there's no guesswork involved!
  • Don't forget the most basic of stamping techniques...using markers directly on the rubber of your stamps.  This is how I created the Rich Razzleberry vase with the Old Olive stems sticking out.  Don't forget to breathe on the stamp before stamping to moisten the ink!

Supplies

Stamps:  Button Buddies and A Little Birthday
Ink:  Rich Razzleberry and Old Olive Classic Ink, Whisper White Craft Ink
Paper:  Pacific Point, Tangerine Tango, and Whisper White card stock, Summer Smooches Designer Series Paper
Accessories:  Big Shot, Labels Collection Framelits, Festive Paper Piercing Pack, Paper Piercing Tool and Mat, Daffodil Delight Taffeta Ribbon, Buttons, White Baker's Twine

Friday, July 26, 2013

How Not to Make a Card

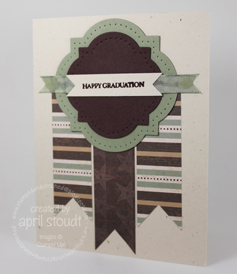
I can't even believe I'm showing this card for the world to see.  At first glance, it looks OK, right?  Yeah, not so fast.  I made one huge mistake, so let's consider this post a public service announcement of sorts.  Don't use glue under taffeta ribbon.  If you didn't notice before, I'm sure that you can now see the line of glue under the ribbon on this card.  Um, whoops.  Here's the best part...the only reason I put the ribbon there was to cover up the tops of the striped banners that were sticking out from behind the green card stock. A mistake on top of a mistake.  Nice.

Speaking of green card stock, don't get too attached.  This card is full of retired product, including that Mellow Moss card stock and the Outlaw DSP.  It's time for me to start using up my stash, and this DSP seemed like a good choice for a masculine card that I needed in a hurry (which is also why I didn't fix the ribbon/glue fiasco.)

So there you go...not the world's most beautiful card, but a functional and easy layout that I hope you'll try on your own.  Just don't use glue and taffeta ribbon.

Stamps:  Teeny Tiny Wishes
Ink:  Chocolate Chip
Paper:  Outlaw DSP (retired), Mellow Moss (retired), Chocolate Chip, and Naturals Ivory card stock
Accessories:  Big Shot, Window Frames Framelits, Paper-Piercing tool, mat, and Festive Paper-Piercing Pack, Bitty Banners Framelits, taffeta ribbon :)

Wednesday, July 10, 2013

{CASE} Simple Butterfly


I tend to be fairly original in my card designs, but every now and then I just need to CASE another person's work.  Some people do this all the time, and that's totally fine!  There is absolutely NO shame in CASEing a card...because much of the time, we add our own original touches to the design.  But even if that's not the case, it's the creating that counts, not whether or not the design in original to you (although it's always good to give credit to the original artist!)

When I saw this card by Mary Fish, I just loved the simple, clean lines of it.  I've been in a bit of a stamping slump lately, so I knew this was a great card to CASE.   As you can see, I've just changed up the papers and the sentiment, but pretty much kept everything else the same.  I do love her clean and simple designs, which is what attracted me to this card.  I think the paper-piercing is my favorite part!

How about you?  Do you like to come up with original designs, or do you prefer to CASE?

Stamps:  Thoughts & Prayers
Ink:  Early Espresso Stampin' Write Marker
Paper:  Summer Starfruit, Naturals Ivory, and Soft Suede card stock, Comfort Cafe DSP (retired)
Accessories:  Neutrals Designer Buttons, Linen Thread, Paper Piercing tool, mat, and pack, Elegant Butterfly punch

Monday, September 10, 2012

Simple Snail

I feel like apologies are needed for so many reasons...I meant to post this on Friday, but we were scurrying around packing to leave to go to my cousin's wedding.  We were two hours into the trip when I realized that I hadn't posted it.  That was also around the time when my daughter announced that she had not packed shoes to wear to the wedding.  I got to make a trip to the mall on Saturday morning to find some sandals for her.  The good news about that was that we did find a pair, and they were 50% off the clearance price! Hooray for good deals!  And, I should add, the wedding was lovely.  He was the last of all my cousins to get married, and I'm so happy for them! 

My other apology is for the photography.  There is a really cool element on this card, and the poor photography really doesn't show it off.  This little snail is from the Button Buddies set.  I love how each image works well alone, but looks even better with a button on top.  But what do you do if you don't have the right colored button?  This was the question I was asking myself, because there are no Tangerine Tango buttons.  The simple solution is Crystal Effects.  I simply stamped onto a piece of Tangerine Tango, punched out the shell part of the snail using the 3/4" circle punch, then used Crystal Effects on top.  The CE takes awhile to dry, so be sure to do that first, and be prepared to set it aside for a while and go fold some laundry.  Or, if you are lucky enough not to have clothes waiting in your dryer, you can just make more cards while you wait. :)

While it might be tempting to do the Crystal Effects first, but it's important to do that after punching.  Once dry, the CE will make it difficult, if not impossible to fit the card stock into the punch.  Also, don't run your dry CE through your Big Shot unless you want it to be flattened.  Just ask me how I know. :)

Stamps: Button Buddies
Ink:  Tangerine Tango Classic Ink
Paper:  Floral District DSP, Naturals White, Tangerine Tango, and Lucky Limeade card stock
Accessories:  Labels Framelits Collection, Paper Piercing Tool, Pack and Mat, Lucky Limeade Ruffled Ribbon, Stripes Embossing Folder, Big Shot

Wednesday, August 22, 2012

Tri-Fold Thanks

Happy Wednesday!  I just wanted to quickly show you this CASE of one of Shelli Gardner's cards.  I changed up the colors a bit, and the layering is just slightly different (I like Shelli's better, but I was too lazy to go back and change my card!), but other than that, it's pretty much exactly the same!  I just thought it was a really cool twist on a tri-fold card.

Stamps:  Friendship Preserves, Timber wheel
Ink:  Elegant Eggplant, Always Artichoke, Crumb Cake markers
Paper:  Crumb Cake, Elegant Eggplant, Always Artichoke, More Mustard, Very Vanilla card stock
Accessories:  Always Artichoke seam binding ribbon, Window Frames Framelits, Paper Piercing Tool and Piercing Pack, Square Lattice embossing folder

Wednesday, May 23, 2012

Old and New

Here's a bright, fun card using the retiring set, Always Elegant.  I've always thought that it matched the Elegant Lines embossing folder so well, which is why I used them together!


This card features the combination of Pacific Point, Tempting Turquoise, and Old Olive.  I simply ran the Pacific Point card stock through the Big Shot with the Elegant Lines embossing folder, and used the crimper on the little strip of Tempting Turquoise.  I'm sad that the crimper is retiring...I like to use it to give a bit of texture to little pieces like that one.  I tied a piece of whisper white 1/4" grosgrain ribbon around the crimped piece...the ribbon is retiring, too!  I used Staz-On black in to stamp the image on Whisper White card stock.  That's important, because the black won't run when watercoloring.  I dipped the tip of my aquapainter into the ink from the top of my ink pads to color in parts of the image, and then added some rhinestones to a couple of spots.  They're hard to see in the picture, but I promise they're there!  Oh, and those little tags...I stamped them with the Tiny Tags set and punched them with the Jewelry Tag punch, then poked a hole with my paper piercing tool. 


And now for some new stuff!  This card has a fun color combination, which I pulled from the Floral District DSP.  It, and the bird from Betsy's Blossoms, are both mounted on Daffodil Delight card stock.  I also used a piece behind the strip of Tangerine Tango, both of which I punched with the scallop edge punch and then pierce with my paper piercing tool (did you know there's a brand new one coming out in the new catalog?  The mat is bigger and there are templates that match some of the new Framelits...so exciting!)  Back to the card...I rounded the corners on the DSP and bird pieces, then added some brand new Daffodil Delight 1/4" stitched grosgrain ribbon...it's such cute stuff!  I also sponged the edges of the bird and added a little bit of white baker's twine to a button before popping it on as a final touch.