Well, I'm a little late in posting this week, but it was because I didn't have any time to stamp this weekend! And this card is for the person responsible for that. My friend Cathy organized a mini-retreat for homeschool moms this weekend, and it was WONDERFUL! Homeschooling is really hard sometimes (and I know it's not for everyone). It's totally worth it, because I know it's best for my family. But it's still easy to get burnt out, especially at this time of year when you just. want. to. be. done. Actually, I'd bet money that every single teacher out there feels that way right about now...especially the ones who have been doing standardized testing over the past few weeks!
Anyway, I had a wonderfully relaxing weekend, even though it didn't involve stamping.
Supplies
Stamps: Itty Bitty Banners, Hardwood
Ink: Soft Suede and Crumb Cake
Paper: Crumb Cake, Naturals White, and Cherry Cobbler card stock
Accessories: Big Shot, Hearts Collection Framelits, Bitty Banners Framelits, Cherry Cobbler Seam Binding Ribbon, retired ribbon...for a similar look, try the 7/16" Trim instead!
Showing posts with label Hearts Collection Framelits. Show all posts
Wednesday, April 9, 2014
Monday, February 10, 2014
Just Sayin'
I've waited a long time to order from the Occasions Catalog, and the Just Sayin'/Word Bubbles Framelits bundle was the first thing on my list. So I think it's funny that the first card I made only used the words from one stamp, and didn't use the Framelits at all! Don't worry, I'll be playing with those a lot more this week and will have plenty of cards to show in the next couple of weeks!
I decided to play with the current Fab Friday color challenge this week. I wasn't in love with the color combination at first, but I figured it was a great way to stretch and try something new. I'm so glad I did, because I really like these colors together! In fact, check back on Wednesday for another card using these same colors! I might be sort of addicted to this combination.
Tips & Tricks
Stamps: Just Sayin', Oh Hello, Gorgeous Grunge, Banner Blast
Ink: Real Red and Coastal Cabana
Paper: Crumb Cake, Real Red, Coastal Cabana, and Whisper White card stock
Accessories: Big Shot, Hearts Collection Framelits, Chevron Embossing Folder, Small Heart Punch, Whisper White Baker's Twine
I decided to play with the current Fab Friday color challenge this week. I wasn't in love with the color combination at first, but I figured it was a great way to stretch and try something new. I'm so glad I did, because I really like these colors together! In fact, check back on Wednesday for another card using these same colors! I might be sort of addicted to this combination.
Tips & Tricks
- You might notice that I didn't use a single heart/Valentine stamp on this card. That's because I don't have any current ones, and my old retired ones just weren't singing out to me. That's when my Hearts Collection Framelits and Small Heart Punch come in handy! I used three different stamps, then just punched or cut out the heart shapes. It's a great way to add texture to cards. The dots, chevron, and splatter prints all came from different stamp sets, but are really fun together. And none of them were heart shaped stamps.
- Use a marker and color right on your stamps to either get a multi-colored image or just select a part of an image (like I did here.) I didn't want the word bubble around the words this time, so I just used my Real Red marker to color the words and stamp on my card.
Stamps: Just Sayin', Oh Hello, Gorgeous Grunge, Banner Blast
Ink: Real Red and Coastal Cabana
Paper: Crumb Cake, Real Red, Coastal Cabana, and Whisper White card stock
Accessories: Big Shot, Hearts Collection Framelits, Chevron Embossing Folder, Small Heart Punch, Whisper White Baker's Twine
Wednesday, February 5, 2014
Cut-out Heart Valentine Card
Since Valentine's Day is quickly approaching, I thought it would be fun to share another Valentine card. This one is unique and was fun to make. I used my Hearts Collection Framelits to cut a heart from the center of this square card. Windows are always a fun addition to any card!
Here's a close-up of the heart that you see through the window. I experimented to get this embossed look, and was happy with the way it turned out.
Tips & Tricks
Stamps: Teeny Tiny Wishes, Pennant Parade
Ink: VersaMark, Cherry Cobbler, Crumb Cake
Paper: Cherry Cobbler, Crumb Cake, Naturals Ivory
Accessories: Big Shot, Hearts Collection Framelits, Iridescent Ice and Gold Embossing Powders, Heat Tool, Pretty Print Embossing Folder, Bitty Banners Framelits, Crochet Lace, Cherry Cobbler Seam Binding Ribbon, Sponge
Here's a close-up of the heart that you see through the window. I experimented to get this embossed look, and was happy with the way it turned out.
Tips & Tricks
- Did you know that you can mix embossing powders? I combined Gold and Iridescent Ice to get a sparkly gold color. You could mix Iridescent Ice with any color to give it a little bit of sparkle. I store my mixed color embossing powders in empty embellishment containers.
- Have you ever tried the faux metal technique? Cover the surface you're embossing with VersaMark ink, then sprinkle with embossing powder and heat with your heat tool. Repeat this two more times. As soon as you've embossed the third time, stamp your image or greeting into the still warm surface. The stamp will sort of sink down into the soft, melted powder, giving the look of embossed metal. It does use a fair amount of embossing powder, but it's a fun technique.
Stamps: Teeny Tiny Wishes, Pennant Parade
Ink: VersaMark, Cherry Cobbler, Crumb Cake
Paper: Cherry Cobbler, Crumb Cake, Naturals Ivory
Accessories: Big Shot, Hearts Collection Framelits, Iridescent Ice and Gold Embossing Powders, Heat Tool, Pretty Print Embossing Folder, Bitty Banners Framelits, Crochet Lace, Cherry Cobbler Seam Binding Ribbon, Sponge
Monday, January 20, 2014
Valentine Shadow Box Card
It's been a long time since I made a shadow box card, and I'm so glad I decided to try it again. These are such fun cards to make, and are super-impressive without a lot of work. The best part is that they fold up and fit into a standard sized envelope!
Tips & Tricks
Stamps: Yippee-Skippee (love), Oh Hello (chevron), Map It Out (little heart)
Ink: Raspberry Ripple Classic Ink Pad and Stampin' Write Marker, Early Espresso Stampin' Write Marker
Paper: Naturals White, Primrose Petals, and Raspberry Ripple card stock
Accessories: Big Shot, Hearts Collection Framelits, Chevron Embossing Folder, Clear Block A, Raspberry Ripple Stitched Satin Ribbon, Stampin' Dimensionals, Sticky Strip
Tips & Tricks
- You'll need to cut three different pieces of card stock: the front and back pieces should be 3 1/4" x 8" and the middle piece should be 3 1/4" x 6".
- Score your strips of paper at 2" and 6" for the two longer pieces, and at 1" and 5" for the shorter piece.
- Cut out the hearts using the Hearts Collection Framelits. It is so easy to get perfect placement using Framelits and the Magnetic Platform. It's SO much easier than when I made this type of card using punches!
- Do any stamping on the back piece before you start to assemble...it will be MUCH easier that way!
- Be sure to use Sticky Strip to adhere the card stock pieces. There is no substitute! Attach the middle piece to the back piece, setting it inside of the sides of the back. The attach the front to the back. The sides of the front piece should be the sides of the card.
Stamps: Yippee-Skippee (love), Oh Hello (chevron), Map It Out (little heart)
Ink: Raspberry Ripple Classic Ink Pad and Stampin' Write Marker, Early Espresso Stampin' Write Marker
Paper: Naturals White, Primrose Petals, and Raspberry Ripple card stock
Accessories: Big Shot, Hearts Collection Framelits, Chevron Embossing Folder, Clear Block A, Raspberry Ripple Stitched Satin Ribbon, Stampin' Dimensionals, Sticky Strip
Friday, January 10, 2014
Stenciled Hearts Valentine Flip Card
It's not technically mid-January yet, but here I am with the first of many Valentine's cards to come! I've been having fun this week playing with reds and pinks and hearts galore, so I wanted to share at least one of my creations. Unfortunately, I'm having trouble getting as good quality pictures as I'd like, and parts of this card just aren't as visible in the picture on my screen as I wish they were. If you look carefully, the left hand side of the card features a strip of tiny little embossed hearts.
Tips & Tricks
Supplies
Stamps: Oh Hello, Itty Bitty Banners
Ink: Crumb Cake and Cherry Cobbler Classic Ink and Whisper White Craft Ink
Paper: Naturals White, Crumb Cake, and Cherry Cobbler card stock
Accessories: Big Shot, Circle Card Thinlit Die, Hearts Collection Framelits, Adorning Accents Embossing Folders, Bitty Banners Framelits, Small Heart Punch, 2 1/2" Circle Punch, Sponge Dauber
Tips & Tricks
- What's my favorite part of this card? The fact that I didn't use a single Valentine's Day set on it at all! I don't actually have any current ones, so it was time to get creative. I used several different products and techniques to get the holiday look I was going for. So don't distress if you don't have stamps for a specific occasion. Odds are that with a little creativity, you can come up with whatever look you need!
- The hearts on the right hand side of the card were stenciled on, using a sponge dauber and Crumb Cake ink. I punched out the shapes using the littlest die from the Hearts Collection Framelits and the small heart punch. You can easily make a stencil using scrap card stock and any punch or Framelits you have.
Supplies
Stamps: Oh Hello, Itty Bitty Banners
Ink: Crumb Cake and Cherry Cobbler Classic Ink and Whisper White Craft Ink
Paper: Naturals White, Crumb Cake, and Cherry Cobbler card stock
Accessories: Big Shot, Circle Card Thinlit Die, Hearts Collection Framelits, Adorning Accents Embossing Folders, Bitty Banners Framelits, Small Heart Punch, 2 1/2" Circle Punch, Sponge Dauber
Tuesday, July 16, 2013
Washi Tape Love
After dealing with computer issues yesterday, I'm a little slow in posting this week. Nothing like starting out a Monday by discovering that your laptop is useless until you purchase a very expensive replacement part. I love our Apple products, but they seriously need to develop a power cord that lasts more than two years. Or, if they are really going to have such a short life span, then they need to drastically reduce the price on those babies. We're on cord number three now. And they are. not. cheap. Oh, and the battery needs to be replaced as well, hence the uselessness of the laptop without the cord.
But you're not here to listen to me whine about my computer issues...you want to see a card. This is a quick and cute little 3"x3" card. I simply cut out the heart with my trusty Big Shot and the Hearts Collection Framelits. I then placed a few pieces of Gingham Garden Designer Washi Tape on a 2 1/2"x2 1/2" piece of Whisper White card stock, and adhered it to the inside of the front flap. I popped a couple of (retired) buttons on the front, and stamped a little sentiment on the bottom. Voila! This would be perfect to stick in someone's lunch with a little "I love you" note. Easy-peasy and super cute!
Stamps: Pennant Parade
Ink: Island Indigo
Paper: Island Indigo and Whisper White card stock
Accessories: Big Shot, Hearts Collection Framelits, buttons, Whisper White Baker's Twine, Gingham Garden Designer Washi Tape
But you're not here to listen to me whine about my computer issues...you want to see a card. This is a quick and cute little 3"x3" card. I simply cut out the heart with my trusty Big Shot and the Hearts Collection Framelits. I then placed a few pieces of Gingham Garden Designer Washi Tape on a 2 1/2"x2 1/2" piece of Whisper White card stock, and adhered it to the inside of the front flap. I popped a couple of (retired) buttons on the front, and stamped a little sentiment on the bottom. Voila! This would be perfect to stick in someone's lunch with a little "I love you" note. Easy-peasy and super cute!
Stamps: Pennant Parade
Ink: Island Indigo
Paper: Island Indigo and Whisper White card stock
Accessories: Big Shot, Hearts Collection Framelits, buttons, Whisper White Baker's Twine, Gingham Garden Designer Washi Tape
Thursday, February 14, 2013
Happy Valentine's Day!
I'll admit, this day is sooooo not a big deal in my house. I usually try to do something fun for the kids, but that's about it. But hey, if you celebrate today, have fun!
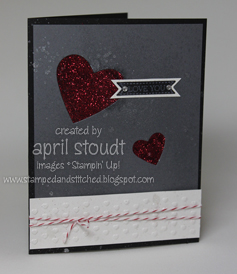
Do you ever have an idea for a card that looks great in your head, but just doesn't translate to paper in quite the same way? Yeah, this card would be a prime example of that. It just didn't turn out quite how I had planned, and everything I did to jazz it up fell a little flat. But there are some great elements on it, so let's talk about those. :)
The hearts...I'll be you're thinking that's red glimmer paper. And that would have been a far easier way to make this card. But that's not what's going on here. I placed couple of my Hearts Collection Framelits on the Basic Gray cardstock. Once the holes were created, I stuck a piece of packing tape to the back, then sprinkled some (very old) red glitter on the sticky side of the tape. It's a pretty cool technique, and given the amount of retired glitter I have, I should be using this technique a lot more.
The little strip of hearts at the bottom...I simply sent a strip of Naturals White card stock through my Big Shot using the Adorning Accents Embossing Folders, then tied a piece of Cherry Cobbler Baker's Twine around it (I love that stuff...I will cry if SU! ever retires Baker's Twine!)
Stamps: Itty Bitty Banners (126255)
Ink: Whisper White Craft Ink (101731)
Paper: Basic Black (121045), Basic Gray (121044), Naturals White (102316) card stock
Accessories: Big Shot (113439), Hearts Collection Framelits (125599), (129267), Adorning Accents Embossing Folders (125601), Rhinestones Basic Jewels (119246), Cherry Cobbler Baker's Twine (123125), red glitter (retired)
Do you ever have an idea for a card that looks great in your head, but just doesn't translate to paper in quite the same way? Yeah, this card would be a prime example of that. It just didn't turn out quite how I had planned, and everything I did to jazz it up fell a little flat. But there are some great elements on it, so let's talk about those. :)
The hearts...I'll be you're thinking that's red glimmer paper. And that would have been a far easier way to make this card. But that's not what's going on here. I placed couple of my Hearts Collection Framelits on the Basic Gray cardstock. Once the holes were created, I stuck a piece of packing tape to the back, then sprinkled some (very old) red glitter on the sticky side of the tape. It's a pretty cool technique, and given the amount of retired glitter I have, I should be using this technique a lot more.
The little strip of hearts at the bottom...I simply sent a strip of Naturals White card stock through my Big Shot using the Adorning Accents Embossing Folders, then tied a piece of Cherry Cobbler Baker's Twine around it (I love that stuff...I will cry if SU! ever retires Baker's Twine!)
Stamps: Itty Bitty Banners (126255)
Ink: Whisper White Craft Ink (101731)
Paper: Basic Black (121045), Basic Gray (121044), Naturals White (102316) card stock
Accessories: Big Shot (113439), Hearts Collection Framelits (125599), (129267), Adorning Accents Embossing Folders (125601), Rhinestones Basic Jewels (119246), Cherry Cobbler Baker's Twine (123125), red glitter (retired)
Subscribe to:
Posts (Atom)