Showing posts with label 3D. Show all posts

Wednesday, February 19, 2014

Spiral Flower Burlap Wreath


I mentioned on Monday that I've been playing with the Spiral Flower Die, and as you can see, I've been busy!  This die makes creating felt roses a breeze.  They were so easy and they look beautiful!  I've also been playing around with making a burlap wreath, and I think I've decided I like this one.  I'm all about neutrals, and the larger flowers add just a bit of springtime pop.  Because this wreath is made of fabric, it could be hung on the outside of a door.  I may hang mine on the front of my house.

Tips & Tricks
  • Cut a few pieces of felt at once!  I fold my sheet of felt in half and run it through the Big Shot, but you could add at least one more layer of felt.
  • Jumbo Sticky Rounds are the key to easily making rolled fabric flowers.  I've seen some tutorials online that tell you to use glue, and that just seems so messy to me.  By tying a knot at the end of the strip of fabric, just roll around and around as your flower forms right on the Jumbo Sticky Round.  It is SO easy!
Supplies:

Spiral Flower Die, Big Shot, Jumbo Sticky Rounds, Beau Chateau Designer Fabric, burlap, 14" straw wreath, hot glue gun and glue

Friday, February 14, 2014

Happy Valentine's Day Card in a Box

This is another project I've been wanting to make for a while.  It's a tad more complicated than the wreath I showed yesterday, but still very manageable.  I decided to use up the rest of the pack of Designer Series Paper I used for that project, since I had lots of little scraps along with the full sized sheets I used for the wreath.  I also used some retired paper (hello, Pretty in Pink!) and a retired stamp set.

Tips & Tricks

  • Use sticky strip!  I've see so many references online about using glue, and I just don't get it.  Why make a mess when a few little pieces of sticky strip will accomplish the same thing and it won't make a mess.
  • Stamps with coordinating punches or Framelits are perfect for this card, especially if you don't want to do a lot of fussy cutting.  The hearts were stamped and punched, and it made the making of this card much easier.  I've seen gorgeous samples of this type of card using the Background Basics stamp set and coordinating Framelits, and they were gorgeous!

I think this card has quite the wow factor, and I will definitely be making more in the future.  Next up will be a birthday version for my sister-in-law, who has a birthday coming up later this month. 

Stamps: Love You Much (retired)
Ink:  Chocolate Chip, Very Vanilla (retired), Real Red, and Old Olive
Paper: Real Red, Pretty in Pink (retired), Naturals Ivory
Accessories:  2 1/2" Circle Punch, Brights Buttons (retired), Whisper White Baker's Twine, Sticky Strip, Aquapainters, Heart to Heart punch (retired)

Thursday, February 13, 2014

Valentine Curly Paper Wreath

It's Thursday,  and surprise...I have a bonus post today!  I have wanted to make one of these wreaths for months, and just never remembered to get the wreath form when I was at the craft store.  I finally made a point of getting one (even though I really wanted a heart-shaped one) and sat down to make this.

What have I been waiting for?  These are so easy to make and are such a great way to use up odds and ends of Designer Series Paper.  I had a few sheets left of some Valentine-y paper from a couple of years ago, and decided this was the perfect way to weed out my stash. 

While most of the wreaths I've seen online are 12" circles, I went with a 10" circle because I knew that I wouldn't have enough DSP for the larger one.  It was a good call, because I didn't even have enough as it was.  The giant bow is covering up the fact that I ran out of paper.   But I kind of like it, and the bonus part is that I used up that spool of giant pink ribbon. 

If you'd like to make one of these, just let me know.  I'd be happy to sit down and help you gather the supplies and walk you through it!

Friday, April 19, 2013

Stampin' Up! Regional Projects (Part 3)

Here's the last project from last Saturday's Regional event in Baltimore.  Have I mentioned how much fun I had?  Oh, right, I did.  This one is my favorite.  It's taken me a while, but I'm finally on the Calypso Coral bandwagon, which is good, since it will be a new core color come June 1.  It's so pretty...bright and soft all at the same time.  And the look of it changes drastically depending on what other colors it's paired with (here with Pool Party and Gumball Green...never would have thought of that on my own!)  Now that's the mark of a truly versatile color!

This adorable little box was made using the Two Tags Die.  This thrills me to no end, because I happen to own that die and can make as many of this little boxes as my heart desires.  There are five little note cards tucked into the box, and that flag...easy to make using a toothpick!  As with the other two projects, this one uses Clockworks, as you can see on the note card.  But look closely, because I also stamped it on the flower.  I love this little box.  I'm not sure who I should give it to, but I'm thinking that it would make a perfect hostess gift.  If you'd like to be the recipient, give me a call and we'll schedule a workshop where you and all your friends can learn to stamp together.  And they will all be super jealous because I will give you this adorable box full of cute little cards. (And if you hate the box, but still want to schedule a workshop, you should still call me!)

Wednesday, April 17, 2013

Stampin' Up! Regional Projects (Part 2)

This notebook is another project we made on Saturday.  I did mine slightly different than the directions, which said to stamp off before stamping any of the images.  I went for a bit of a brighter look and did a mix of regularly stamped images and stamped off images (compare the clock at the top to the one on the bottom and you'll see the difference.) 

This was a really fun project to make, and while it's a bit bulky, I'm excited to use it.  It's pretty and quirky, and yet again, I was pleasantly surprised at how it turned out using the Clockworks stamp set.  My favorite part, though, its that flower.  I veered slightly from the directions on that, as well, when I divided my three punched flowers into six layers.  I love how the petals curl up!

Friday, March 29, 2013

Birthday Basket

I thought I'd show you a little basket that I made for one of my hostesses.  I missed her birthday and didn't send a card, so she got this instead.  This cute little basket is made with the Mini Milk Carton Bigz Die.  Rather than cutting out one and assembling it as normal, I cut two, then after a bit of trimming, put them together to make this little six-sided basket.  I crimped a few strips of paper to stuff in, then added a little gift and a card.
I seem to be obsessed with tiny square cards lately, and really, with the size of this basket, I didn't have a choice...I had to use a tiny card!  A few squares of bright card stock layered together make this simple and adorable.
And one final look at the basket...since it was for a birthday, I used the little present stamp from the Every Little Bit stamp set.  That's one set that is great for any number of occasions, and yet I don't use it nearly enough. 

Stamps:  Every Little Bit (117096), Itty Bitty Banners (126255)
Ink:  Wild Wasabi (126959), Daffodil Delight (126944), Melon Mambo (126948) Classic Ink, Jet Black Staz-On Ink (101406)
Paper:  Whisper White (100730), Wild Wasabi (108641), Daffodil Delight (119683), Melon Mambo (115320), and Naturals White (102316) card stock
Accessories:  Mini Milk Carton Bigz Die (117310), Big Shot (113439), Aquapainters (103954), Rhinestone Basic Jewels (119246), Melon Mambo ribbon (retired), Chevron Embossing Folder (127749), Bitty Banners Framelits (129267)

Tuesday, January 8, 2013

Nifty Notebook

Happy New Year!  I'm a little later saying that than I had planned to be.  After we got home from our unexpected trip, I got sick.  Really sick.  I rarely get sick, and rarely get the flu, but I got hit hard on New Year's Day.  Ugh.  Not fun.  I'm glad to be feeling much better now, and hopefully no one else in my family will get it!

I thought I'd share this fun little notebook that I made for my friend for her birthday.  We both turned 40 in December, and have had a great time celebrating.  We took an overnight trip to our alma matter this past weekend, staying in the guest house on campus.  It was great, since the students hadn't returned, and the campus was empty.  We had lovely weather and got to do lots of relaxing.  It was a fun way to celebrate and a great way to start a new year.

Anyway, I used a clear case from Stampin' Up! and decorated it with Designer Series Paper.  This paper is OLD, so it's no longer available, but from all my paper, this is the one that I thought best fit her.  I didn't have a single piece of purple DSP, which really would have been ideal, but I like the funky little flowers, and I think they are fitting for her.  I put a fun little monogram on the front to personalize it.
The inside is simple, with a small notepad, a pen, and a little envelope for any receipts or random items she may want to hang onto.  This was an easy and fun project to make, and I think that I'll be making more in the future! 

Saturday, November 3, 2012

Give Thanks Board


How fun is this board?  Some friends and I made these last weekend.  Each day has a piece of card stock in a pocket, and on that card stock, you write what you are thankful for that day.  There are several ways to do it, but our family is writing the date and year, and then each of us is writing what we're thankful for. Well, I'm writing it...I really should have my kids' handwriting on this, but I also want to conserve space.  I probably need to lighten up and just have them do it.  There is no way I can regret having my kids' handwriting preserved in this way from year to year.  OK, I just talked myself into it! :)

I'd love to say that this board was all my idea, but it wasn't.  This is just my variation on this one.  I used all Stampin' Up! products (of course!) and instead of using plywood, I used fabric to cover a piece of foam board.  It's much easier to hang up because it's so light.  I'm hoping this is a great new tradition for our family.

Wednesday, October 10, 2012

Candy Dish

I made this cute little candy dish on Saturday so we could have a fun way to eat our treats at the Stamp-a-Stack on Sunday.  Because fall colored M&Ms should really be housed in a cute fall-ish container.  :) I guess it's not actually a little candy dish...it's actually not little.  It's made from a full piece of 12x12 card stock, so the bottom and the sides all measure 4" square. 
Here's a view from the top.  I just tied a bunch of different ribbons around the top to make it pretty.  It was so easy to make...I was actually surprised at how quickly I was able to follow these directions and put it together. 

Stamps:  Day of Gratitude
Ink:  Old Olive, More Mustard, and Cajun Craze
Paper:  Autumn Spice DSP (retired), Cajun Craze 12x12 card stock, Early Espresso Core'dinations and Very Vanilla card stock
Accessories:  Early Espresso 1/8" taffeta ribbon, Crochet Trim, Lucky Limeade Ruffled Ribbon, More Mustard 1/4" grosgrain ribbon

Speaking of the Stamp-a-Stack on Sunday, I'll have those cards coming up later this week.  And if you're interested in coming to our last Christmas Card Stamp-a-Stack on Dec. 2, just let me know!

Friday, September 28, 2012

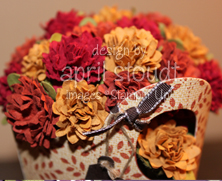
A Basket of Mums

I went digging in the archives for this one. :)  Actually, it's never been posted here, just on my official Stampin' Up! website.  Back when I originally made this, I entered this project in a contest on Shelli Gardner's blog, and was honored to have been selected as a winner!  And since it is one of my all time favorites, I decided to post it here. 


Fall is my favorite time of year and I've been having so much fun playing with all the gorgeous new colors Stampin' Up! introduced this year.  Cajun Craze, Cherry Cobbler and More Mustard are the perfect fall colors.  I wanted to come up with something that was unusual, but very fall-like.  I was inspired by the gigantic mum that is planted by my front door.  I haven't ever seen anyone make mums, so I was on my own to come up with a way to do it (although surely someone has figured this out before me!)  I'm so pleased with the way the flowers turned out!

To make the mums, I punched three petals with the Boho Blossoms punch for each flower.  I then used the faux suede technique to end up with six layers.  I popped a brad through all six layers, then fluffed up each layer around the brad.  It's that simple!

 I used the Baskets and Blooms die and my Big Shot to cut out the basket, as well as the Jewelry Tag punch for the little tags.  I love that punch!  To get the word "Blessings" on the tag, I used a Stampin' Write marker to color the single word from one of the stamps in the Falling Leaves set.  After stamping the word, I punched out the tag.

I hope you enjoyed this blast from the past.  This is one of my favorite fall decorations, and I really need to get it out this weekend!  Who am I kidding...I need to ask my husband to go to the attic and get the big box of decorations down for me. :)