I thought it was high time I popped in here to mention that yes, I'm still alive, and to explain where the heck I've been for the past four months. :) If you know me in real life, you know the past couple of years have been jam packed with a lot of loss and some pretty hard stuff. Just life, but it all seemed to happen in a fairly condensed period of time. And very little of it was (is) good, with one glaring exception. Since January, we've been working our tails off to get our house ready to sell, and finally (FINALLY!) it's on the market. This has been a dream for a long, long time, and the prospect of moving is so exciting to us. But with all that tough stuff and hard work, something had to go. Actually more than one something, but for the point of this post, blogging had to go. I just needed to take a break to focus on other things. And in all honesty, I haven't been feeling overly creative lately anyway.
I do have a pile of cards waiting to be photographed and posted, and hopefully that will happen soon. But I can't make any promises--who knows, maybe my house will sell tomorrow. :) When things settle down a bit, I'm planning to begin blogging regularly, but for now, my energies are being directed toward other areas. For those of you who have emailed and asked me if everything was OK and wondered where I was, thank you.
I'm still planning on holding events, so know that I do have some things in the works! And hopefully soon, I can show off all kinds of pictures of my new stamping space, wherever that may be!

Tuesday, April 28, 2015

Thursday, December 25, 2014
Merry Christmas!

I think the only thing I changed was to put the wreath and the gold and black layers on a Cherry Cobbler card base, instead of a Basic Black base. The black was stunning, but I love the Cherry Cobbler. It's also easier to write on the inside and have it show up. :)
The wreath is embossed with gold embossing powder and I used Cherry Cobbler Dazzling Details for the berries.
Supplies
Stamps: Wonderful Wreath, Good Greetings
Ink: Gold
Paper: Cherry Cobbler and Basic Black card stock, Gold Foil sheet
Accessories: Big Shot, Wondrous Wreath Framelits, Cherry Cobbler Seam Binding Ribbon, Cherry Cobbler Dazzling Details
Merry Christmas, everyone! I hope this day is full of joy and celebrating the Greatest Gift!
Wednesday, December 24, 2014
Bright & Beautiful Shaker Card

I've never made a shaker card before, but I'm hooked. It is so easy. I can't wait to make more!
Tips & Tricks
- To make this shaker card, I stamped the medium star from Bright & Beautiful, then cut it out with the coordinating Stars Framellits.
- Next, I punched a circle in the center of the star.
- I then cut out a larger circle in whisper white and stamped the smallest star in Lost Lagoon.
- I also cut out a larger circle from a piece of Window Sheet.
- Adhere the Window Sheet to the back of the star, and set aside to dry.
- Then, take one of the foam circles from the Shaker Frames, and adhere it to the Whisper White circle. These are great, because you'll get six sets of foam circles in different sizes to make tons of shaker cards! Think Stampin' Dimensionals, only in circle form.
- Before you remove the backing off the top of the Shaker Frames, put some glitter or other filler into the circle. I just used glitter, but if you have the Star Confetti Punch, you could punch some little stars in different colors and put those in. Or, do a combination of both!
- Remove the adhesive backing, and set the large star on top of the Whisper White/Shaker Frames piece.
- That's is, now you have the hardest part done! And it wasn't even that hard!
- To finish this card, I placed some Soft Sky card stock and All is Calm DSP on the front of a Lost Lagoon card base. I tied a piece of Soft Sky Seam Binding Ribbon where the two papers meet, stamped "Merry Christmas" at the bottom, and then adhered my star to the front.
If you haven't made a shaker card, what are you waiting for? Don't wait as long as I did...these are so fun!
Supplies
Stamps: Bright & Beautiful, Good Greatings
Ink: Lost Lagoon
Paper: Lost Lagoon, Soft Sky, and Whisper White card stock, All is Calm DSP, Window Sheets
Accessories: Big Shot, Stars Framelits, 1" and 1 1/4" Circle Punches, glitter
Wednesday, December 10, 2014
Frozen Snowflake Card


Stamps: Letterpress Winter
Ink: Lost Lagoon, Whisper White
Paper: Soft Sky card stock, Dazzling Diamonds Glimmer Paper
Accessories: Big Shot, Snowflake Card Thinlits
Monday, December 8, 2014
Bright & Beautiful Christmas Card
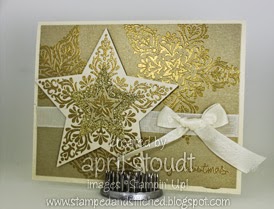
This gold star card is a little bit involved. It's not hard, but there are a lot of steps, and trying to perfectly place the largest star from the Bright & Beautiful stamp set is a little tricky because of the giant wood block it's mounted on.
Every star on this card is embossed with gold embossing powder, and I love the way it looks. The middle layer of the focal star is cut from gold glimmer paper. There is so much sparkle and shine on this card, and even though I don't normally love gold, I love this card.
Supplies
Stamps: Bright & Beautiful, Good Greetings
Ink: Gold
Paper: Naturals Ivory and Brushed Gold card stock, Gold Glimmer paper
Accessories: Big Shot, Stars Framelits, Very Vanilla Seam Binding Ribbon, Heat Tool, Gold embossing powder
Friday, December 5, 2014
Simple Endless Wishes Card

I don't think this card really needs an explanation, but I do want to point out the dot of Cherry Cobbler Dazzling Details in the center of the snowflakes. It gives just a little pop to an otherwise flat (but super cute!) card.
Supplies
Stamps: Endless Wishes
Ink: Crumb Cake and Cherry Cobbler
Paper: Crumb Cake and Cherry Cobbler card stock, Trim the Tree DSP stack
Accessories: Cherry Cobbler Dazzling Details, Cherry Cobbler Baker's Twine
Wednesday, December 3, 2014
Quilted Gingerbread Christmas

To make this card, I simply punched out six different patterns of DSP with my square punch. I adhered them to a piece of Garden Green card stock, then ran it through my Big Shot using the Argyle embossing folder. I also love the now-retired Square Lattice embossing folder, but when I made this card, I wanted to use something current. While nothing gives a quilted look the way the Square Lattice folder does, the good news is that the Argyle folder is a great alternative.
I used an old (but much loved!) stamp set called Gingerbread Christmas, and colored in the image with Aquapainters and ink. I punched it out with the Decorative Label punch, added some seam binding ribbon, and that's it! I did offset the quilted piece intentionally, but as I study the picture, I think it might look better if it's centered. If you try it that way, I'd love to see a picture!
Supplies
Stamps: Gingerbread Christmas (retired)
Ink: Garden Green and Real Red ink, StazOn Jet Black ink
Paper: Real Red, Garden Green, and Naturals Ivory card stock, Holly Berry Bouquet DSP
Accessories: Big Shot, Argyle embossing folder, Decorative Label punch, Very Vanilla Seam Binding Ribbon
Monday, December 1, 2014
Golden Endless Wishes

I've been having fun making Christmas cards in non-traditional colors this year. I've made a few in browns and golds, which isn't something I would expect myself to like. This one uses Soft Suede and gold, and a bit of Naturals White. It's a simple card, but I added a little bit of sparkle to the Endless Wishes snowflakes by putting a dot of Dazzling Details in the center of each.
Supplies
Stamps: Endless Wishes
Ink: Gold
Paper: Soft Suede, Naturals White, Gold Foil Sheets
Accessories: Wonderful Wreath Framelits, Big Shot, Deco Frames Framelits, cotton ribbon (retired), Dazzling Details-gold
Thursday, November 27, 2014
Happy Thanksgiving!

I thought that this card was quite appropriate today, as this card embodies Thanksgiving (at least to me!) Before running the background of the card through my Big Shot with the Woodgrain embossing folder, I randomly stamped with the splatter stamp in the Gorgeous Grunge set. I used Baked Brown Sugar ink on BBS card stock. Next, I used the faux suede technique on the strips of Cajun Craze and Crushed Curry.
For the "thanks" in the center, I used the rock & roll technique with Crushed Curry, Cajun Craze, and Cherry Cobbler ink. Beginning with the Curry, ink the entire stamp. (But don't stamp on the paper yet!) Next, roll the edges of the stamp in Cajun, making sure to pick up enough ink to go beyond the very edge of the stamp. I will sometimes flip the stamp and put the ink to the stamp, rather than stamp to ink. Finally, roll the edges in Cherry Cobbler. Breathe on the stamp to moisten the ink, and stamp. Cut out using Apothecary Accents Framelits, snipping off the right hand side with paper snips.
I topped the whole thing off by dyeing piece of Cotton Ribbon to match the Baked Brown Sugar card stock. I simply filled an empty spritzer with rubbing alcohol, then added a few drops of ink refill. I spritzed the ribbon until it was the desired shade. I prefer this method, as it's not quite as messy as using an ink pad to dye ribbon.
Supplies
Stamps: Seasonally Scattered, Gorgeous Grunge
Ink: Baked Brown Sugar, Crushed Curry, Cajun Craze, Cherry Cobbler
Paper: Baked Brown Sugar, Crushed Curry, Cajun Craze, Very Vanilla card stock
Accessories: Big Shot, Apothecary Accents Framelits, Woodgrain Embossing Folder, Linen Thread, Cotton Ribbon, Paper Snips, Sponge
Monday, November 24, 2014
For All Things

Tips & Tricks
- This card uses the emboss resist technique. I first stamped the speckles from Gorgeous Grunge in Crumb Cake, then embossed the leaves with clear embossing powder. The speckles will be visible though the leaves, which gives them a bit of interest and texture.
- Next, I used a sponge to rub Crushed Curry ink over one end of the strip of card stock, and Cherry Cobbler at the other end. I saved Cajun Craze for last, so that when I rubbed that in the middle, it would overlap and blend with the Crushed Curry and Cherry Cobbler.
- Because of the texture of the leaf stamp, this image will pick up a bit of the ink as it's rubbed over the embossing. I love the way it looks on this card, but wanted to point it out in case anyone was expecting it to be a perfectly clean image.
Stamps: For All Things
Ink: Crumb Cake, Crushed Curry, Cajun Craze, Cherry Cobbler
Paper: Cajun Craze and Naturals White card stock
Accessories: Color Me Autumn Designer Washi Tape, Sponge, Clear Embossing Powder, Heat Tool, Linen Thread
Wednesday, November 19, 2014
So Sorry Joy Fold Card

I thought it would be fun to show two different ways to make a Joy Fold card. The first way, shown above, is the traditional orientation for a Joy Fold card. But check out how it looks when you simply turn the card and have it open vertically, instead of horizontally. Fun, right?

Supplies
Stamps: Thoughts & Prayers, So Sorry (retired)
Ink: Sahara Sand and Tangerine Tango markers
Paper: Sahara Sand and Very Vanilla card stock, Sweater Weather DSP (retired)
Accessories: Simply Scored Scoring Tool
Monday, November 17, 2014
Simple For All Things Card

Tips & Tricks:
- I don't think this card needs a lot of explanation, but I will point out that the button was made using the Simply Pressed Clay and Molds, and I colored the clay using a few drops of Crushed Curry ink refill.
- Did you know that there are a couple of great ways to speed up the process of making clay embellishments? It takes a while for the clay to air dry, and I'm far too impatient for that! Just pop the mold into the freezer (deep freeze works best) after putting the clay in the mold. After about 15 minutes, the clay will be frozen and able to be removed from the mold easily. Set it aside to air dry, or, if you happen to have a dehydrator, you can put it on a tray to dry more quickly. I usually make a bunch using the freezer method, then put all of them in my dehydrator to dry. It takes less than an hour.
Stamps: For All Things
Ink: Sahara Sand, Elegant Eggplant, and Crushed Curry (ink refill)
Paper: Sahara Sand, Cajun Craze, Very Vanilla card stock
Accessories: Simply Pressed Clay and Molds, Very Vanilla 1/8" taffeta ribbon, Color Me Autumn Designer Washi Tape
Friday, November 14, 2014
Wondrous Wreath

For this card, I used Pear Pizzazz, Old Olive, and Cherry Cobbler. I love these three colors together. The wreath is topped of with a simple bow made of Cherry Cobbler Seam Binding ribbon. If you wanted to jazz up the wreath a bit, you could add a dot of Cherry Cobbler Dazzling Details on each berry.
This card could be made in more color combinations than I can count. I like the traditional Christmas colors, but this same card would be gorgeous in just about any color combination. Give it a try!
Supplies
Stamps: Wondrous Wreath, Good Greetings, Hardwood
Ink: Pear Pizzazz, Old Olive, Cherry Cobbler, Crumb Cake
Paper: Cherry Cobbler, Naturals White, Whisper White card stock
Accessories: Big Shot, Wonderful Wreath Framelits, Cherry Cobbler Seam Binding Ribbon
Wednesday, November 12, 2014
Letterpress Winter Snowflake Flip Card

I used all three snowflakes in the stamp set, stamping them randomly on the card background in Whisper White ink. I then stamped the largest snowflake in the center using Lost Lagoon ink. Lost Lagoon is gorgeous with Soft Sky, in case you can't tell from the picture! I used the snowflake dies that come with the the card die to punch out one snowflake from silver Glimmer Paper, and the other from Lost Lagoon card stock. I cut banners for the greeting from the same papers.
I plan to play with this stamp set and color combination a lot more. My little great-nieces are obsessed with Frozen, and I know they would go crazy if I could make a Frozen-like card and send it to them in the mail. I can just hear the squeals now. :)
Supplies
Stamps: Letterpress Winter, Teeny Tiny Wishes
Ink: Whisper White, Lost Lagoon
Paper: Soft Sky and Lost Lagoon card stock, Silver Glimmer Paper
Accessories: Big Shot, Snowflake Card Thinlits, Bitty Banners Framelits, Paper Snips, Clear Blocks
Monday, November 10, 2014
Chocolate Treat Holders

I thought I'd take a little break from Christmas cards to show you this cute little treat holder my daughter made for me. It fits two Ghirardelli chocolate squares inside, and has room for a little note on the back (that was my favorite part, although I'm not showing a picture of that.)

This little cutie is so easy to make. Just cut a strip of card stock 2" x 8 1/2" long, and score at 4" and 4 1/2". Then punch the ends using the Scallop Tag Topper Punch. Tie a bow through the holes, and decorate the front as you choose. She used some retired card stock and Designer Series Paper and scallop circle punches.
Thursday, November 6, 2014
Stitched Stocking Flip Card

I pulled out some retired items to make Christmas cards this year. So many of my old stamps don't get a lot of use anymore, which is a shame, because I have so many, and I really like them all! Stitched Stockings was a set that retired way to early, in my opinion. It was great because the Stocking Builder Punch coordinated with it, making it so easy to punch out those little pieces for the heel, toe, and cuff of the stocking.
For this card, I used it along with the Circle Card Thinlits, because really, who doesn't love a good flip card? The white circle behind the stocking was embossed using the Argyle embossing folder. I loved that it tied in perfectly with the argyle pattern on the stocking. Argyle always makes me think of middle school, where there was a (very strict) dress code, and my friends and I wore knee socks every day. It was always fun when we wore our argyle socks on the same day. Oh, to be twelve again. No, wait. That would mean I'd have to be 13 and 14 again. No thanks.
Getting back to the card...I chose a pattern from the Trim the Tree Designer Series Paper Stack that looked like knitting. I figured that it kind of went with the stocking theme. The little strip across the bottom is embossed using the now retired Needlepoint Border embossing folders (another one that retired too quickly!) The little "Merry Christmas" comes from Teeny Tiny Wishes, which is probably my most used stamp set. If you're looking for a basic sentiment set that covers just about every occasion, this is it. Let me know if you'd like to order it!
Supplies
Stamps: Teeny Tiny Wishes, Stitched Stockings
Ink: Garden Green, Cherry Cobbler
Paper: Garden Green, Cherry Cobbler, Whisper White, and Trim the Tree Designer Series Paper Stack
Accessories: Big Shot, Circle Card Thinlits, Needlepoint Border embossing folder, Argyle embossing folder, Stocking Builder Punch, Cherry Cobbler Baker's Twine, 2 1/2" Circle Punch
Tuesday, November 4, 2014
Christmas Bauble

This card uses the new single stamp Christmas Bauble. I think it pairs so well with the Filigree Frame embossing folder. I highlighted the embossed parts of this cute folder by using a sponge dauber and Pool Party ink. It came out a little heavier on the ink than I had intended, and I loved seeing the variations different people did when making this at my Christmas card event. Some went even heavier, and some very light. I love that five people can make the same card and they will all have a unique element to it. That's what creating is supposed to yield--a unique product that shows a little of the person creating it.
The banners on the card are just pieces of three of the All Is Calm Designer Washi tapes, and I just snipped the ends to give them a more finished look. The bauble is embossed in silver, then water colored. See below for the exact colors I used. It's kind of an unconventional color scheme for Christmas, but it's such a pretty combination.
Supplies
Stamps: Christmas Bauble
Ink: Island Indigo, Pool Party, Smokey Slate, Pear Pizzazz
Paper: Pool Party, Whisper White, and Naturals White card stock
Accessories: Big Shot, Filigree Frame embossing folder, All Is Calm Designer Washi Tape, Sponge Dauber, Aquapainter, Stampin' Dimensionals, and Paper Snips (yes, that bauble is cut out by hand...no Framelits for this one!)
Monday, October 27, 2014
Endless Wishes

I randomly stamped the snowflakes in white, and to give them a little bit of sparkle, I added some silver Dazzling Details. Rhinestones look even more amazing, but since I was trying to keep the cost of the card down, I went with the more economical DD. I stamped the sentiment in Crumb Cake on Naturals White card stock, and then added a beautiful bow made of Crumb Cake Seam Binding Ribbon. Don't forget to round the corners of the card to add a fun detail. So simple, and so pretty!
Supplies
Stamps: Endless Wishes
Ink: Crumb Cake, Whisper White
Paper: Crumb Cake, Naturals White
Accessories: Big Shot, Apothecary Accents Framelits, Crumb Cake Seam Binding Ribbon, Silver Dazzling Details
Wednesday, October 15, 2014
Daydream Medallions

Fortunately, I did find one card sitting in my draft folder, and today is a good day to share this one. I love interactive cards, and this is a really fun and unique one. It's definitely an unconventional way to use the Daydream Medallions stamp set and the coordinating Floral Frames Framelits.

- To make this fun closure on your card, it's important to score your card so that it has two flaps in the front. I scored a strip of 4 1/4" x 11" at the 3" and 8 1/2" marks, then folded the flaps in.
- For the flower part, stamp three different sizes from Daydream Medallions, then cut the outside shape of each layer.
- It helps to distress the edges of the flower layers, so be sure to do this step next, whether using the distressing tool, scissors, or just your fingernail. Don't decide to wait until later to do this part...it is much easier to do it now!
- After distressing, go ahead and cut out the center of the largest flower, using the same Framelit used to cut the outside of the middle flower. This allows the two layers to fit together perfectly.
- To finish, adhere the two smallest layers together, then attach to the right side of the card. Center over the seam, and only adhere the right half of the flowers to the right flap of the card. Adhere the left half of the largest flower to the left flap. Be very careful not to let your adhesive go outside of these areas, or the card will end up being glued shut.
- Embellish with a button and ribbon. I also added leaves using Flower Patch and the Flower Fair Framelits. I did have to snip off the ends, so don't be afraid to do that if necessary. I also recommend playing with the placement of the leaves to be sure it looks good behind two layers and three layers. Depending on whether the card is open or closed, you'll be looking at it with both combinations.
Stamps: Daydream Medallions, Flower Patch
Ink: Elegant Eggplant, Crumb Cake, Versamark
Paper: Crumb Cake, Cajun Craze, Always Artichoke, and Elegant Eggplant
Accessories: Big Shot, Lacy Brocade embossing folder, Floral Frames and Flower Fair Framelits, Stamp-a-ma-jig
Tuesday, September 30, 2014
For All Things Flip Card

The coordinating Color Me Autumn Designer Washi Tape and the Crushed Curry embossing powder used on the sentiment tie the card together and add a pop of color. The square-ish stamp in For All Things was used on the center circle, as well as the background of the card. I stamped and then stamped again without reinking in order to add variation. The inside circle is identical to the outside circle shown here, just without the washi tape and button.
Supplies
Stamps: For All Things
Ink: Elegant Eggplant, Sahara Sand, VersaMark
Paper: Elegant Eggplant and Very Vanilla card stock
Accessories: Big Shot, Circle Card Thinlits, Color Me Autumn Designer Washi Tape, Crushed Curry embossing powder, Heat Tool, Linen Thread, button, 2 1/2" Circle Punch
Subscribe to:
Posts (Atom)